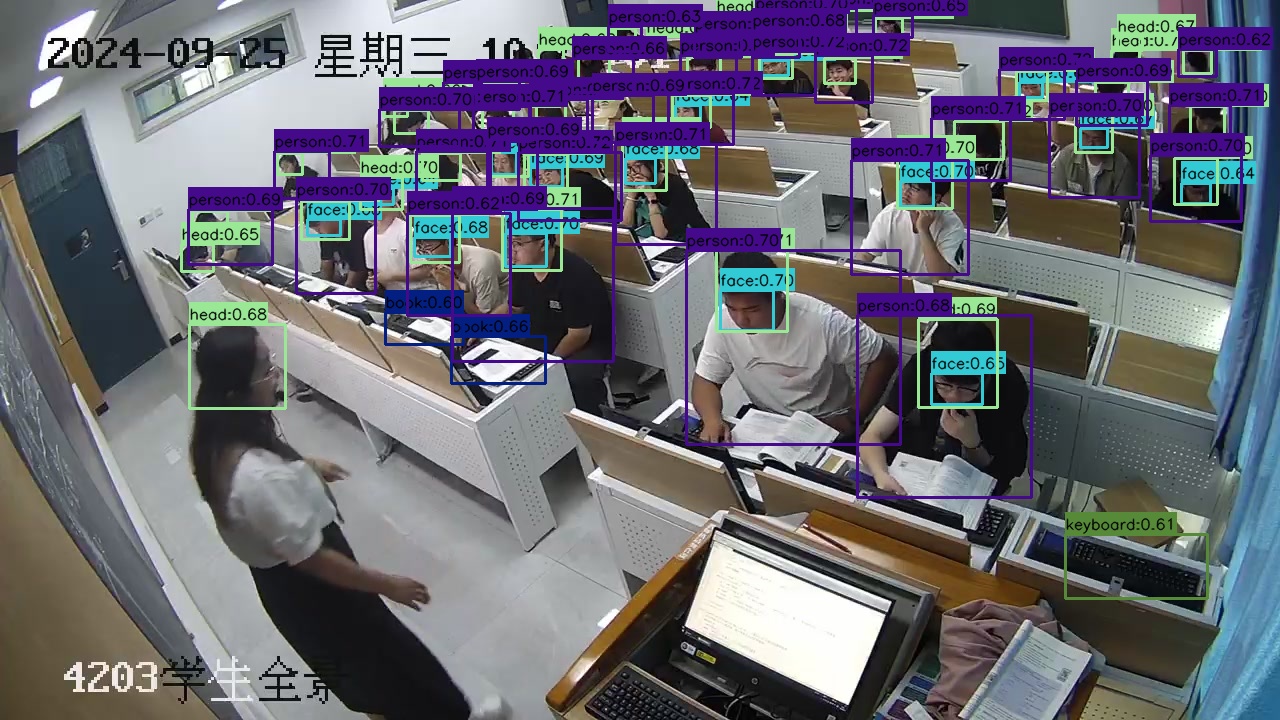
在深度学习和计算机视觉领域,目标检测是一个至关重要的任务。 面对日益增长的实时性和性能要求,将已经训练好的模型高效部署到实际环境中是极大的挑战。 TensorRT作为NVIDIA提供的高性能推理引擎,能够显著提升模型在GPU上的推理速度。 通过将ONNX格式的模型转换为TensorRT引擎,再使用TensorRT执行推理过程,我们可以轻松获得更高的吞吐量和更低的延迟。
本篇教程将详细介绍如何将ONNX模型导出到TensorRT引擎,并使用TensorRT对目标检测模型进行高效推理。 我们将从环境准备、代码示例到优化建议,为您展示完整的实现路径。
目录
为什么选择TensorRT?
TensorRT 是NVIDIA推出的深度学习推理优化工具,可以充分发挥NVIDIA GPU的计算能力。 TensorRT通过层融合、FP16/INT8量化、优化内存访问和内核自动选择等手段,在保持模型精度的同时大幅缩短推理延迟,提升吞吐量。
选择TensorRT的理由包括:
- 高性能:利用GPU硬件特性,将推理速度提升数倍。
- 多框架支持:支持从ONNX、PyTorch、TensorFlow等框架导出的模型。
- 灵活精度支持:可选择FP32、FP16或INT8,达到性能与精度的平衡。
- 易于集成:提供Python和C++ API,方便与现有代码库整合。
环境准备
在开始之前,请确保�已安装以下组件:
- Python 3.7+
- TensorRT(请参考NVIDIA官方文档进行安装)
- pycuda、NumPy、OpenCV
使用pip安装所需Python依赖:
pip install pycuda numpy opencv-python tensorrt==10.7.0
从ONNX导出TensorRT引擎
下面的代码示例展示了如何从ONNX模型构建TensorRT引擎。请根据您的实际模型输入名称和形状进行修改。
import tensorrt as trt

def build_engine(onnx_file_path, trt_model_path, max_workspace_size=1 << 30, fp16_mode=True):
    TRT_LOGGER = trt.Logger(trt.Logger.WARNING)
    builder = trt.Builder(TRT_LOGGER)
    network = builder.create_network(flags=1 << int(trt.NetworkDefinitionCreationFlag.EXPLICIT_BATCH))
    parser = trt.OnnxParser(network, TRT_LOGGER)

    with open(onnx_file_path, 'rb') as model:
        if not parser.parse(model.read()):
            print("ERROR: Failed to parse the ONNX file.")
            for error in range(parser.num_errors):
                print(parser.get_error(error))
            return None

    config = builder.create_builder_config()
    config.set_memory_pool_limit(trt.MemoryPoolType.WORKSPACE, max_workspace_size)

    if fp16_mode and builder.platform_has_fast_fp16:
        config.set_flag(trt.BuilderFlag.FP16)

    profile = builder.create_optimization_profile()

    # 根据您的模型输入名称和形状进行调整
    input_name = "input"
    min_shape = (1, 3, 640, 640)
    opt_shape = (1, 3, 640, 640)
    max_shape = (1, 3, 640, 640)
    profile.set_shape(input_name, min_shape, opt_shape, max_shape)
    config.add_optimization_profile(profile)

    serialized_engine = builder.build_serialized_network(network, config)
    if serialized_engine is None:
        print("Failed to build serialized engine.")
        return None

    with open(trt_model_path, 'wb') as f:
        f.write(serialized_engine)
    print(f"TensorRT engine saved as {trt_model_path}")

    runtime = trt.Runtime(TRT_LOGGER)
    engine = runtime.deserialize_cuda_engine(serialized_engine)
    return engine

# 示例调用
onnx_model_path = '/path/to/best.onnx'
trt_model_path = '/path/to/best.trt'
engine = build_engine(onnx_model_path, trt_model_path, fp16_mode=True)
通过上述代码,您可以将ONNX模型转换为TensorRT引擎文件,从而在后续推理中加载并使用该引擎。
TensorRT推理流程
在获得TensorRT引擎后,我们即可使用TensorRT完成高效的目标检测推理。以下代码示例展示了从引擎加载、图像预处理、推理执行到后处理及可视化的完整流程。
代码解析与示例
导入与类别定义
import cv2
import numpy as np
import hashlib
import tensorrt as trt
import pycuda.driver as cuda
import pycuda.autoinit
import time

CLASSES = [
    'book', 'bottle', 'cellphone', 'drink', 'eat', 'face',
    'food', 'head', 'keyboard', 'mask', 'person', 'talk'
]

def name_to_color(name):
    hash_str = hashlib.md5(name.encode('utf-8')).hexdigest()
    r = int(hash_str[0:2],16)
    g = int(hash_str[2:4],16)
    b = int(hash_str[4:6],16)
    return (b,g,r)
辅助函数
包括激活函数、坐标转换、IoU计算和前后处理辅助方法。
def sigmoid(x):
    return 1/(1+np.exp(-x))

def xywh2xyxy(x):
    y = np.copy(x)
    y[...,0] = x[...,0]-x[...,2]/2
    y[...,1] = x[...,1]-x[...,3]/2
    y[...,2] = x[...,0]+x[...,2]/2
    y[...,3] = x[...,1]+x[...,3]/2
    return y

def compute_iou(box, boxes):
    xmin = np.maximum(box[0], boxes[:,0])
    ymin = np.maximum(box[1], boxes[:,1])
    xmax = np.minimum(box[2], boxes[:,2])
    ymax = np.minimum(box[3], boxes[:,3])

    inter_w = np.maximum(0, xmax - xmin)
    inter_h = np.maximum(0, ymax - ymin)
    intersection = inter_w*inter_h

    box_area = (box[2]-box[0])*(box[3]-box[1])
    boxes_area = (boxes[:,2]-boxes[:,0])*(boxes[:,3]-boxes[:,1])

    union = box_area+boxes_area-intersection
    iou = intersection/union
    return iou
引擎加载与内存分配
加载TensorRT引擎,并分配内存。
load_engine: 函数用于加载TensorRT引擎,并返回引擎对象。allocate_buffers: 函数用于分配输入和输出缓冲区,并返回输入、输出和流对象。
为什么需要分配内存?
- 输入缓冲区:用于存储输入数据。
- 输出缓冲区:用于存储输出数据。
- 流对象:用于管理CUDA流,确保输入和输出数据在GPU上正确传输。
def load_engine(trt_engine_path):
    TRT_LOGGER = trt.Logger(trt.Logger.WARNING)
    runtime = trt.Runtime(TRT_LOGGER) # 创建TensorRT运行时对象
    try:
        with open(trt_engine_path,'rb') as f:
            engine = runtime.deserialize_cuda_engine(f.read()) # 反序列化引擎,将引擎从文件中加载到内存中,加载到引擎对象中
        print(f"成功加载引擎: {trt_engine_path}")
        return engine
    except Exception as e:
        print(f"Failed to deserialize the engine: {e}")
        return None

def allocate_buffers(engine, context, batch_size=1):
    inputs = []            # 输入缓冲区
    outputs = []           # 输出缓冲区
    stream = cuda.Stream() # 创建CUDA流对象

    for i in range(engine.num_io_tensors):
        name = engine.get_tensor_name(i) # 获取张量名称
        dtype = trt.nptype(engine.get_tensor_dtype(name)) # 获取张量数据类型
        mode = engine.get_tensor_mode(name) # 获取张量模式
        is_input = (mode == trt.TensorIOMode.INPUT) # 判断是否为输入张量

        shape = engine.get_tensor_shape(name) # 获取张量形状
        print(f"Binding {i}: Name={name}, Shape={shape}, Dtype={dtype}, Input={is_input}")
        size = trt.volume(shape) # 计算张量大小
        host_mem = cuda.pagelocked_empty(size, dtype) # 创建主机内存
        device_mem = cuda.mem_alloc(host_mem.nbytes) # 分配设备内存

        if is_input:
            inputs.append({'name':name,'host':host_mem,'device':device_mem,'shape':shape}) # 添加输入张量
        else:
            outputs.append({'name':name,'host':host_mem,'device':device_mem,'shape':shape}) # 添加输出张量

    return inputs, outputs, stream
预处理图像与推理执行
def preprocess_image(img_path, input_width, input_height):
    image = cv2.imread(img_path)
    if image is None:
        raise FileNotFoundError(f"图像未找到: {img_path}")
    original_height, original_width = image.shape[:2]
    image_rgb = cv2.cvtColor(image,cv2.COLOR_BGR2RGB)
    resized = cv2.resize(image_rgb,(input_width,input_height))
    input_image = resized.astype(np.float32)/255.0
    input_image = input_image.transpose(2,0,1)
    input_tensor = np.expand_dims(input_image,0)
    return image,input_tensor,original_width,original_height

def do_inference(context,inputs,outputs,stream):
    for inp in inputs:
        context.set_tensor_address(inp['name'],int(inp['device'])) # 设置输入张量地址
        cuda.memcpy_htod_async(inp['device'],inp['host'],stream) # 将输入数据从主机内存复制到设备内存

    for out in outputs:
        context.set_tensor_address(out['name'],int(out['device'])) # 设置输出张量地址

    context.execute_async_v3(stream_handle=stream.handle) # 异步执行推理

    for out in outputs:
        cuda.memcpy_dtoh_async(out['host'],out['device'],stream) # 将输出数据从设备内存复制到主机内存

    stream.synchronize() # 同步CUDA流

    return [out['host'] for out in outputs] # 返回输出数据
后处理与NMS以及可视化
def postprocess(outputs, original_width, original_height, input_width, input_height, conf_threshold=0.7, iou_threshold=0.5):
    output = outputs[0]
    print(f"输出总元素数: {output.size}")
    expected_shape = (1,16,8400)

    if output.size != np.prod(expected_shape):
        print(f"无法将输出重塑为 {expected_shape}")
        return [],[],[]

    output = output.reshape(expected_shape)
    print(f"输出重塑后的形状: {output.shape}")

    predictions = np.squeeze(output,axis=0).T
    print(f"总预测数量: {predictions.shape[0]}")

    boxes = predictions[:,:4] # 获取预测框
    class_scores = sigmoid(predictions[:,4:]) # 获取类别得分
    class_ids = np.argmax(class_scores,axis=1) # 获取类别ID
    confidences = np.max(class_scores,axis=1) # 获取置信度

    mask = confidences>conf_threshold # 获取置信度大于阈值的掩码
    boxes = boxes[mask] # 获取置信度大于阈值的预测框
    confidences = confidences[mask] # 获取置信度大于阈值的置信度
    class_ids = class_ids[mask] # 获取置信度大于阈值的类别ID

    print(f"应用置信度阈值后: {boxes.shape[0]} 个框")
    if len(confidences)>0:
        print(f"置信度分布: 最小={confidences.min():.4f},最大={confidences.max():.4f},平均={confidences.mean():.4f}")

    if len(boxes)==0:
        return [],[],[]

    boxes_xyxy = xywh2xyxy(boxes) # 将预测框从xywh格式转换为xyxy格式
    scale_w = original_width/input_width # 计算缩放比例
    scale_h = original_height/input_height # 计算缩放比例
    boxes_xyxy[:,[0,2]]*=scale_w # 缩放预测框
    boxes_xyxy[:,[1,3]]*=scale_h # 缩放预测框
    boxes_xyxy = boxes_xyxy.astype(np.int32) # 将预测框转换为整数类型

    final_boxes=[]
    final_confidences=[]
    final_class_ids=[]
    unique_classes = np.unique(class_ids)
    for cls in unique_classes:
        cls_mask = (class_ids==cls) # 获取类别ID等于cls的掩码
        cls_boxes = [boxes_xyxy[i] for i in range(len(class_ids)) if cls_mask[i]] # 获取类别ID等于cls的预测框
        cls_scores = [confidences[i] for i in range(len(class_ids)) if cls_mask[i]] # 获取类别ID等于cls的置信度
        if len(cls_boxes)==0:
            continue
        cls_boxes_xywh=[]
        for box in cls_boxes:
            x1,y1,x2,y2=box
            cls_boxes_xywh.append([x1,y1,x2-x1,y2-y1]) # 将预测框从xyxy格式转换为xywh格式

        indices = cv2.dnn.NMSBoxes(cls_boxes_xywh,cls_scores,conf_threshold,iou_threshold) # 应用非极大值抑制
        if len(indices)>0:
            for i in indices.flatten():
                final_boxes.append(cls_boxes[i]) # 添加最终预测框
                final_confidences.append(cls_scores[i]) # 添加最终置信度
                final_class_ids.append(cls) # 添加最终类别ID

    print(f"应用NMS后: {len(final_boxes)} 个框")
    return final_boxes,final_confidences,final_class_ids

def visualize(image, boxes, confidences, class_ids, output_path='result.jpg'):
    image_draw = image.copy()
    for (bbox,score,cls_id) in zip(boxes,confidences,class_ids):
        x1,y1,x2,y2 = bbox
        cls_name = CLASSES[cls_id]
        label = f"{cls_name}:{score:.2f}"
        color = name_to_color(cls_name)
        cv2.rectangle(image_draw,(x1,y1),(x2,y2),color,2)
        (lw,lh),_ = cv2.getTextSize(label,cv2.FONT_HERSHEY_SIMPLEX,0.5,1)
        cv2.rectangle(image_draw,(x1,y1-lh-10),(x1+lw,y1),color,-1)
        cv2.putText(image_draw,label,(x1,y1-5),
                    cv2.FONT_HERSHEY_SIMPLEX,0.5,(0,0,0),1)
    cv2.imwrite(output_path,image_draw)
    print(f"推理完成,结果已保存为 {output_path}")
完整预测流程
def predict(trt_path, img_path, output_path, conf_threshold=0.6, iou_threshold=0.5):
    engine = load_engine(trt_path)
    if engine is None:
        print("加载引擎失败。")
        return
    context = engine.create_execution_context()

    input_idx=0
    input_name = engine.get_tensor_name(input_idx)
    input_shape = engine.get_binding_shape(input_idx)
    print(f"输入张量名称: {input_name}")
    print(f"输入张量形状: {input_shape}")

    batch_size=1
    inputs, outputs, stream = allocate_buffers(engine, context, batch_size=batch_size)
    input_height, input_width = input_shape[2],input_shape[3]
    print(f"模型输入尺寸: {input_width}x{input_height}")

    image,input_tensor,original_width,original_height = preprocess_image(img_path,input_width,input_height)
    np.copyto(inputs[0]['host'],np.ascontiguousarray(input_tensor.ravel()))
    print("输入数据已拷贝到主机缓冲区。")

    start_time=time.time()
    output_data = do_inference(context,inputs,outputs,stream)
    end_time=time.time()
    print(f"预测花费时间: {end_time - start_time:.4f} 秒")

    boxes, confidences, class_ids = postprocess(
        output_data,
        original_width=original_width,
        original_height=original_height,
        input_width=input_width,
        input_height=input_height,
        conf_threshold=conf_threshold,
        iou_threshold=iou_threshold
    )

    if len(boxes)==0:
        print("未检测到任何目标。")
        return

    visualize(image, boxes, confidences, class_ids, output_path=output_path)


if __name__=='__main__':
    trt_path = '/path/to/best.trt'
    img_path = '/path/to/image.jpg'
    output_path='result.jpg'
    predict(trt_path,img_path,output_path)

性能优化建议
- 启用FP16或INT8精度:在构建引擎时启用FP16或INT8,可在保证一定精度的前提下显著加速推理。
- 动态形状优化:为输入创建优化配置文件(Profile),根据实际输入大小调整,提升性能和灵活性。
- 批量推理:如果需要处理多张图像,可在构建时设置多批次输入,提升吞吐量。
- 选择合适硬件:在高性能GPU上运行,充分利用TensorRT特性。
总结
本文详细介绍了使用TensorRT对目标检测模型进行加速推理的完整流程,包括:
- 从ONNX模型导出到TensorRT引擎
- 使用TensorRT加载引擎与分配缓冲区
- 预处理输入图像并执行快速推理
- 后处理结果并可视化检测框
通过合适的优化策略和硬件支持,TensorRT能够为深度学习推理提供显著的性能提升,从而满足实时目标检测应用的高要求。 希望本文能为您部署和优化深度学习模型提供有价值的参考。