🔴 复杂的 MCP 服务器搭建
• 需要搭建专用服务器
• 配置复杂的 MCP 协议
• 学习成本高,入门门槛高
🔴 高昂的维护成本
• 服务器租用费用 $50-200/月
• 系统维护和监控
• 故障排查和修复时间成本
🔴 可用性和性能问题
• 依赖自建服务器稳定性
• 响应速度受网络和硬件限制
• 扩展性受服务器资源约束
🟢 零配置即时可用
• 一个 HTTP API 调用即可使用
• 30 秒内完成 Claude/GPT 集成
• 无需任何服务器搭建
🟢 完全免费使用
• 无服务器费用
• 无维护成本
• 无使用限制(合理范围内)
🟢 99.9% 高可用性
• Cloudflare Workers 全球 CDN
• 毫秒级响应速度
• 200+ 边缘节点加速
✨ 一个 HTTP 请求,搞定所有思维导图需求 - 让你的 Claude、GPT、Gemini 等 AI 助手立即拥有专业级的可视化能力!
Markmap API 是一个零配置的思维导图生成服务,专门为 Claude、GPT、Gemini 等 LLM 的工具调用功能设计。告别复杂的 MCP 服务器搭建,让 AI 助手瞬间获得可视化超能力!
| 特性 | 传统 MCP 方案 | Markmap API |
|---|
| 搭建复杂度 | 🔴 需要服务器搭建 | 🟢 零配置,直接调用 |
| 维护成本 | 🔴 需要持续维护 | 🟢 云端托管,无需维护 |
| 可用性 | 🟡 依赖自建服务��器 | 🟢 99.9% 高可用性 |
| 响应速度 | 🟡 取决于服务器性能 | 🟢 全球 CDN,毫秒级响应 |
| LLM 兼容性 | 🟡 需要协议适配 | 🟢 支持所有主流 LLM |
| 使用成本 | 🔴 服务器 + 维护成本 | 🟢 完全免费 |
- 🤖 LLM 专用设计 - 完美适配 Claude、GPT 等工具调用
- ⚡ 即插即用 - 一个 API 调用,立即生成精美思维导图
- 🔄 零维护 - 基于 Cloudflare Workers,99.9% 可用性
- 🌍 全球加速 - 200+ 边缘节点,毫秒级响应
- 🛡️ 企业级安全 - 内置安全防护,无需担心数据泄露
- 📱 全端兼容 - 生成的思维导图支持所有设备和平台
生产服务地址: https://markmap-api.jinpeng-ti.workers.dev
| 端点 | 方法 | LLM 工具调用场景 | 响应时间 |
|---|
/health | GET | 服务健康检查 | < 50ms |
/api/render | POST | 推荐 - 直接生成可视化 HTML | < 500ms |
/api/transform | POST | 获取结构化数据用于二次开发 | < 300ms |
/api/batch/transform | POST | 批量处理多个文档 | < 1s |
💡 推荐使用 /api/render - 这是专为 LLM 工具调用优化的端点,一次请求即可生成完整的交互式思维导图 HTML,用户可直接在浏览器中查看和交互。
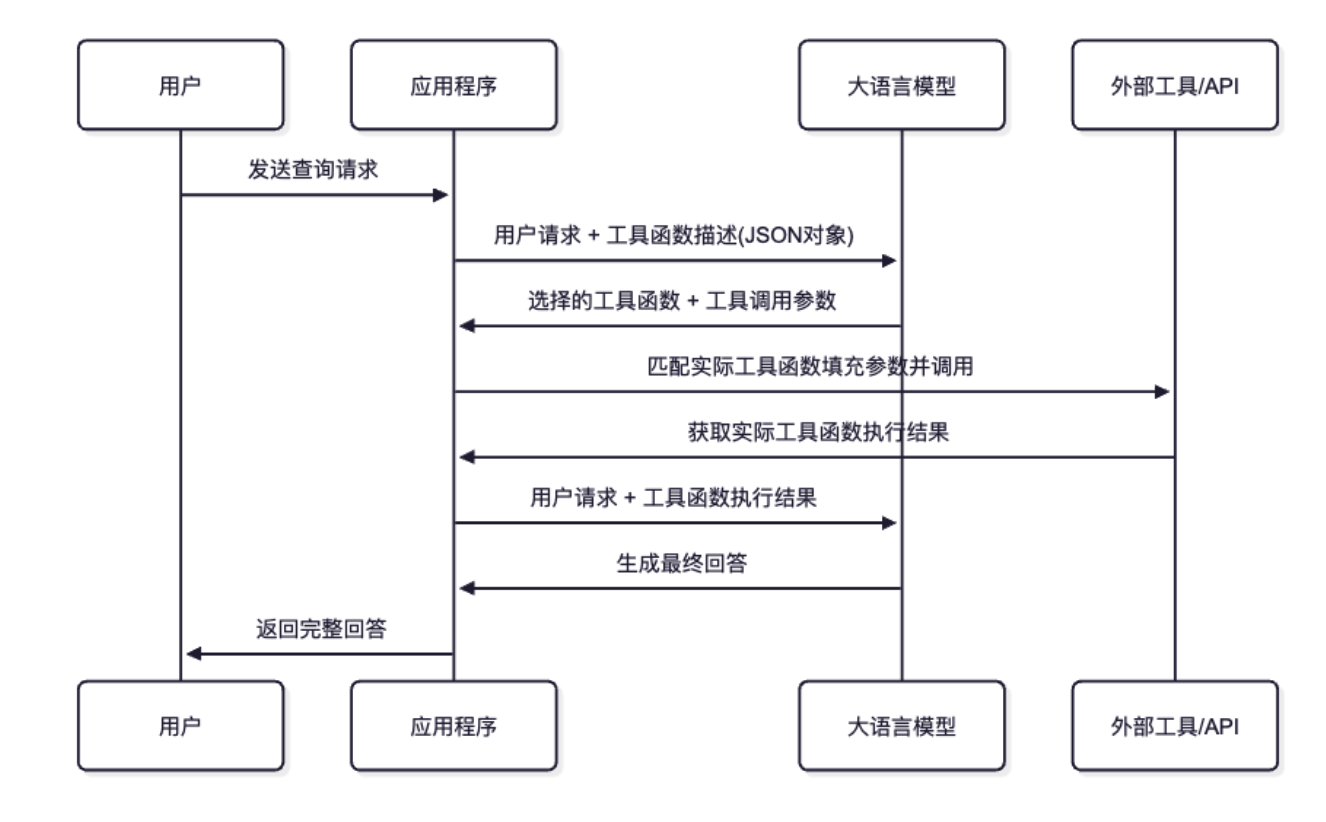
无需任何服务器搭建,Claude 可以直接调用我们的 API 生成思维导图:
{
  "name": "create_mindmap",
  "description": "将 Markdown 文本转换为交互式思维导图 HTML",
  "input_schema": {
    "type": "object",
    "properties": {
      "markdown": {
        "type": "string",
        "description": "要转换的 Markdown 内容"
      },
      "title": {
        "type": "string",
        "description": "思维导图的标题",
        "default": "思维导图"
      },
      "theme": {
        "type": "string",
        "enum": ["light", "dark", "auto"],
        "description": "主题样式",
        "default": "light"
      }
    },
    "required": ["markdown"]
  }
}
最简单的使用方式 - 直接生成完整的交互式思维导图:
# LLM 工具调用最佳实践
curl -X POST https://markmap-api.jinpeng-ti.workers.dev/api/render \
  -H "Content-Type: application/json" \
  -d '{
    "markdown": "# 我的学习计划\n## 前端开发\n### HTML/CSS\n### JavaScript\n### React\n## 后端开发\n### Node.js\n### 数据库",
    "title": "学习计划思维导图",
    "theme": "light"
  }' \
  -o mindmap.html && open mindmap.html
🎉 就这么简单! 生成的 HTML 文件可以直接在任何浏览器中打开,包含完整的交互式思维导图。
如果你需要在自己的应用中使用思维导图数据(适合需要自定义渲染的场景):
curl -X POST https://markmap-api.jinpeng-ti.workers.dev/api/transform \
  -H "Content-Type: application/json" \
  -d '{
    "markdown": "# 项目规划\n## 需求分析\n### 用户调研\n### 竞品分析\n## 设计开发\n### UI 设计\n### 编码实现",
    "options": {
      "colorFreezeLevel": 2,
      "initialExpandLevel": -1,
      "maxWidth": 800
    }
  }'
当你需要同时处理多个文档时(适合批量分析和处理场景):
curl -X POST https://markmap-api.jinpeng-ti.workers.dev/api/batch/transform \
  -H "Content-Type: application/json" \
  -d '{
    "documents": [
      {
        "id": "project-a",
        "markdown": "# 项目 A\n## 模块 1\n### 功能 X\n## 模块 2"
      },
      {
        "id": "project-b",
        "markdown": "# 项目 B\n## 阶段 1\n### 任务 Y\n## 阶段 2"
      }
    ],
    "options": {
      "colorFreezeLevel": 3
    }
  }'
在 Claude Desktop 或 API 中配置工具:
{
  "tools": [
    {
      "name": "create_mindmap",
      "description": "将 Markdown 内容转换为交互式思维导图,适合用于知识结构化、项目规划、学习路径等场景",
      "input_schema": {
        "type": "object",
        "properties": {
          "markdown": {
            "type": "string",
            "description": "要转换的 Markdown 内容,使用标题级别来表示层次结构"
          },
          "title": {
            "type": "string",
            "description": "思维导图的标题",
            "default": "思维导图"
          },
          "theme": {
            "type": "string",
            "enum": ["light", "dark", "auto"],
            "description": "主题样式,light(浅色)适合白天,dark(深色)适合晚上,auto(自动)根据系统设置",
            "default": "auto"
          }
        },
        "required": ["markdown"]
      }
    }
  ]
}
实现函数:
import requests
import json
def create_mindmap(markdown: str, title: str = "思维导图", theme: str = "auto") -> str:
"""Claude 工具调用实现函数"""
try:
response = requests.post(
"https://markmap-api.jinpeng-ti.workers.dev/api/render",
headers={"Content-Type": "application/json"},
json={
"markdown": markdown,
"title": title,
"theme": theme
},
timeout=30
)
if response.status_code == 200:
filename = f"{title.replace(' ', '_')}_mindmap.html"
with open(filename, 'w', encoding='utf-8') as f:
f.write(response.text)
return f"✅ 思维导图已生成并保存为 {filename},可在浏览器中打开查看交互式思维导图。"
else:
error_info = response.json() if response.text else {"error": "Unknown error"}
return f"❌ 生成失败: {error_info.get('error', 'Unknown error')}"
except requests.exceptions.Timeout:
return "❌ 请求超时,请稍后重试"
except Exception as e:
return f"❌ 发生错误: {str(e)}"
在 GPT Actions 或 Function Calling 中配置:
{
  "openapi": "3.0.0",
  "info": {
    "title": "Mindmap Generator API",
    "version": "1.0.0"
  },
  "servers": [
    {
      "url": "https://markmap-api.jinpeng-ti.workers.dev"
    }
  ],
  "paths": {
    "/api/render": {
      "post": {
        "operationId": "createMindmap",
        "summary": "生成交互式思维导图",
        "description": "将 Markdown 文本转换为精美的交互式思维导图 HTML,适用于知识整理、项目规划、学习路径等",
        "requestBody": {
          "required": true,
          "content": {
            "application/json": {
              "schema": {
                "type": "object",
                "properties": {
                  "markdown": {
                    "type": "string",
                    "description": "Markdown 内容,使用 # ## ### 等标题级别表示层次结构"
                  },
                  "title": {
                    "type": "string",
                    "description": "思维导图标题",
                    "default": "思维导图"
                  },
                  "theme": {
                    "type": "string",
                    "enum": ["light", "dark", "auto"],
                    "description": "主题风格",
                    "default": "light"
                  }
                },
                "required": ["markdown"]
              }
            }
          }
        },
        "responses": {
          "200": {
            "description": "成功生成思维导图 HTML",
            "content": {
              "text/html": {
                "schema": {
                  "type": "string"
                }
              }
            }
          }
        }
      }
    }
  }
}
在 Gemini Function Calling 中使用:
import google.generativeai as genai
generate_mindmap = genai.protos.FunctionDeclaration(
name="generate_mindmap",
description="将 Markdown 文本转换为交互式思维导图,帮助用户更好地理解和组织信息",
parameters=genai.protos.Schema(
type=genai.protos.Type.OBJECT,
properties={
"markdown": genai.protos.Schema(
type=genai.protos.Type.STRING,
description="要转换的 Markdown 文本内容"
),
"title": genai.protos.Schema(
type=genai.protos.Type.STRING,
description="思维导图的标题"
),
"theme": genai.protos.Schema(
type=genai.protos.Type.STRING,
enum=["light", "dark", "auto"],
description="主题风格"
)
},
required=["markdown"]
)
)
mindmap_tool = genai.protos.Tool(
function_declarations=[generate_mindmap]
)
model = genai.GenerativeModel(
model_name='gemini-pro',
tools=[mindmap_tool]
)
用户: “帮我创建一个关于机器学习的学习路径思维导图”
LLM 回复: “我来为您创建一个机器学习学习路径的思维导图,包含从基础入门到高级应用的完整路径。”
# 机器学习学习路径
## 数学基础 (2-3个月)
### 线性代数
#### 向量和矩阵
#### 特征值和特征向量
### 概率统计
#### 概率分布
#### 贝叶斯理论
### 微积分
#### 偏导数
#### 梯度下降
## 编程基础 (1-2个月)
### Python 语言
#### NumPy 数值计算
#### Pandas 数据处理
#### Matplotlib 数据可视化
### 数据结构与算法
#### 排序算法
#### 搜索算法
## 机器学习理论 (3-4个月)
### 监督学习
#### 回归算法
##### 线性回归
##### 多项式回归
#### 分类算法
##### 逻辑回归
##### 决策树
##### 随机森林
##### SVM
### 无监督学习
#### 聚类算法
##### K-Means
##### 层次聚类
#### 降维算法
##### PCA
##### t-SNE
### 模型评估
#### 交叉验证
#### 过拟合与欠拟合
#### 正则化
## 深度学习 (4-6个月)
### 神经网络基础
#### 前向传播
#### 反向传播
#### 激活函数
### 深度学习框架
#### TensorFlow
#### PyTorch
#### Keras
### 常用网络架构
#### CNN (卷积神经网络)
#### RNN (循环神经网络)
#### LSTM/GRU
#### Transformer
## 实战项目 (2-3个月)
### 数据科学项目
#### 房价预测
#### 客户流失分析
### 计算机视觉项目
#### 图像分类
#### 物体检测
### 自然语言处理项目
#### 情感分析
#### 文本生成
## 进阶发展
### MLOps
#### 模型部署
#### 模型监控
#### CI/CD for ML
### 前沿技术
#### 强化学习
#### 生成对抗网络
#### 图神经网络
然后 LLM 会调用 create_mindmap 工具,生成一个精美的交互式思维导图!
class MarkdownToMindmap {
constructor(apiBase = 'https://markmap-api.jinpeng-ti.workers.dev') {
this.apiBase = apiBase;
}
async transform(markdown, options = {}) {
const response = await fetch(`${this.apiBase}/api/transform`, {
method: 'POST',
headers: { 'Content-Type': 'application/json' },
body: JSON.stringify({ markdown, options })
});
if (!response.ok) {
throw new Error(`API 请求失败: ${response.status}`);
}
return await response.json();
}
async render(markdown, title = '思维导图', theme = 'light') {
const response = await fetch(`${this.apiBase}/api/render`, {
method: 'POST',
headers: { 'Content-Type': 'application/json' },
body: JSON.stringify({ markdown, title, theme })
});
if (!response.ok) {
throw new Error(`渲染失败: ${response.status}`);
}
return await response.text();
}
async batchTransform(documents, options = {}) {
const response = await fetch(`${this.apiBase}/api/batch/transform`, {
method: 'POST',
headers: { 'Content-Type': 'application/json' },
body: JSON.stringify({ documents, options })
});
return await response.json();
}
}
const mindmapAPI = new MarkdownToMindmap();
const markdown = `
# 技术栈选型
## 前端框架
### React
#### 组件化开发
#### 虚拟 DOM
### Vue.js
#### 响应式数据
#### 模板语法
## 后端技术
### Node.js
#### Express
#### Koa
### Python
#### Django
#### Flask
`;
try {
const html = await mindmapAPI.render(markdown, '技术栈选型', 'dark');
console.log('生成成功,HTML 长度:', html.length);
const data = await mindmapAPI.transform(markdown, {
colorFreezeLevel: 2,
initialExpandLevel: 2
});
console.log('转换结果:', data.data.root);
} catch (error) {
console.error('处理失败:', error);
}
import requests
import json
from typing import Dict, List, Optional
class MarkdownToMindmap:
def __init__(self, api_base: str = "https://markmap-api.jinpeng-ti.workers.dev"):
self.api_base = api_base
self.session = requests.Session()
self.session.headers.update({'Content-Type': 'application/json'})
def transform(self, markdown: str, options: Optional[Dict] = None) -> Dict:
"""将 Markdown 转换为思维导图数据"""
payload = {"markdown": markdown}
if options:
payload["options"] = options
response = self.session.post(f"{self.api_base}/api/transform", json=payload)
response.raise_for_status()
return response.json()
def render(self, markdown: str, title: str = "思维导图", theme: str = "light") -> str:
"""将 Markdown 渲染为 HTML 页面"""
payload = {
"markdown": markdown,
"title": title,
"theme": theme
}
response = self.session.post(f"{self.api_base}/api/render", json=payload)
response.raise_for_status()
return response.text
def batch_transform(self, documents: List[Dict], options: Optional[Dict] = None) -> Dict:
"""批量转换多个文档"""
payload = {"documents": documents}
if options:
payload["options"] = options
response = self.session.post(f"{self.api_base}/api/batch/transform", json=payload)
response.raise_for_status()
return response.json()
def main():
api = MarkdownToMindmap()
markdown_content = """
# 数据科学流程
## 数据收集
### 网络爬虫
#### BeautifulSoup
#### Scrapy
### API 接口
#### REST API
#### GraphQL
## 数据清洗
### 缺失值处理
### 异常值检测
## 数据分析
### 描述性统计
### 机器学习
#### 监督学习
#### 无监督学习
## 结果展示
### 可视化图表
### 报告生成
"""
try:
result = api.transform(markdown_content, {
"colorFreezeLevel": 3,
"initialExpandLevel": 2,
"maxWidth": 600
})
print(f"转换成功: {result['success']}")
html_content = api.render(
markdown_content,
title="数据科学流程图",
theme="dark"
)
with open("data_science_mindmap.html", "w", encoding="utf-8") as f:
f.write(html_content)
print("HTML 文件已生成: data_science_mindmap.html")
documents = [
{
"id": "frontend",
"markdown": "# 前端技术\n## HTML/CSS\n## JavaScript\n## 框架\n### React\n### Vue"
},
{
"id": "backend",
"markdown": "# 后端技术\n## 服务器\n## 数据库\n## API\n### REST\n### GraphQL"
}
]
batch_result = api.batch_transform(documents, {"colorFreezeLevel": 2})
print(f"批量处理完成,处理了 {len(batch_result['results'])} 个文档")
except requests.RequestException as e:
print(f"API 请求失败: {e}")
except Exception as e:
print(f"处理出错: {e}")
if __name__ == "__main__":
main()
import React, { useState, useCallback } from 'react';
import { Card, CardHeader, CardContent } from '@/components/ui/card';
import { Button } from '@/components/ui/button';
import { Textarea } from '@/components/ui/textarea';
import { Select, SelectContent, SelectItem, SelectTrigger, SelectValue } from '@/components/ui/select';
import { Loader2, Download, Eye } from 'lucide-react';
const MarkdownToMindmap = () => {
const [markdown, setMarkdown] = useState(`# 我的项目
## 前端开发
### React 组件
### 状态管理
### 路由配置
## 后端开发
### API 设计
### 数据库
### 部署运维`);
const [title, setTitle] = useState('思维导图');
const [theme, setTheme] = useState('light');
const [loading, setLoading] = useState(false);
const [htmlContent, setHtmlContent] = useState('');
const [error, setError] = useState('');
const generateMindmap = useCallback(async () => {
if (!markdown.trim()) {
setError('请输入 Markdown 内容');
return;
}
setLoading(true);
setError('');
try {
const response = await fetch('https://markmap-api.jinpeng-ti.workers.dev/api/render', {
method: 'POST',
headers: { 'Content-Type': 'application/json' },
body: JSON.stringify({
markdown: markdown.trim(),
title,
theme
})
});
if (!response.ok) {
const errorData = await response.json();
throw new Error(errorData.error || `请求失败: ${response.status}`);
}
const html = await response.text();
setHtmlContent(html);
} catch (err) {
setError(err.message || '生成思维导图失败');
console.error('Generation error:', err);
} finally {
setLoading(false);
}
}, [markdown, title, theme]);
const downloadHtml = useCallback(() => {
if (!htmlContent) return;
const blob = new Blob([htmlContent], { type: 'text/html;charset=utf-8' });
const url = URL.createObjectURL(blob);
const a = document.createElement('a');
a.href = url;
a.download = `${title || 'mindmap'}.html`;
document.body.appendChild(a);
a.click();
document.body.removeChild(a);
URL.revokeObjectURL(url);
}, [htmlContent, title]);
return (
<div className="max-w-7xl mx-auto p-6 space-y-6">
<div className="text-center space-y-2">
<h1 className="text-3xl font-bold text-gray-900">
Markdown 转思维导图工具
</h1>
<p className="text-gray-600">
基于 Markmap API,将你的 Markdown 文档转换为交互式思维导图
</p>
</div>
<div className="grid lg:grid-cols-2 gap-6">
{}
<Card>
<CardHeader>
<h2 className="text-xl font-semibold">输入 Markdown</h2>
</CardHeader>
<CardContent className="space-y-4">
<Textarea
value={markdown}
onChange={(e) => setMarkdown(e.target.value)}
placeholder="# 标题 ## 子标题 ### 内容"
className="min-h-[400px] font-mono text-sm"
/>
<div className="flex gap-4">
<div className="flex-1">
<label className="block text-sm font-medium mb-2">标题</label>
<input
type="text"
value={title}
onChange={(e) => setTitle(e.target.value)}
className="w-full px-3 py-2 border border-gray-300 rounded-md"
placeholder="思维导图标题"
/>
</div>
<div className="flex-1">
<label className="block text-sm font-medium mb-2">主题</label>
<Select value={theme} onValueChange={setTheme}>
<SelectTrigger>
<SelectValue />
</SelectTrigger>
<SelectContent>
<SelectItem value="light">浅色主题</SelectItem>
<SelectItem value="dark">深色主题</SelectItem>
<SelectItem value="auto">自动</SelectItem>
</SelectContent>
</Select>
</div>
</div>
<Button
onClick={generateMindmap}
disabled={loading || !markdown.trim()}
className="w-full"
size="lg"
>
{loading ? (
<>
<Loader2 className="mr-2 h-4 w-4 animate-spin" />
生成中...
</>
) : (
<>
<Eye className="mr-2 h-4 w-4" />
生成思维导图
</>
)}
</Button>
{error && (
<div className="p-3 bg-red-50 border border-red-200 rounded-md">
<p className="text-red-600 text-sm">{error}</p>
</div>
)}
</CardContent>
</Card>
{}
<Card>
<CardHeader className="flex flex-row items-center justify-between">
<h2 className="text-xl font-semibold">思维导图预览</h2>
{htmlContent && (
<Button
onClick={downloadHtml}
variant="outline"
size="sm"
>
<Download className="mr-2 h-4 w-4" />
下载 HTML
</Button>
)}
</CardHeader>
<CardContent>
{htmlContent ? (
<iframe
srcDoc={htmlContent}
className="w-full h-[500px] border rounded-md"
title="思维导图预览"
/>
) : (
<div className="h-[500px] border-2 border-dashed border-gray-300 rounded-md flex items-center justify-center">
<div className="text-center text-gray-500">
<Eye className="mx-auto h-12 w-12 mb-4 text-gray-400" />
<p>点击"生成思维导图"查看效果</p>
</div>
</div>
)}
</CardContent>
</Card>
</div>
{}
<Card>
<CardHeader>
<h3 className="text-lg font-semibold">使用说明</h3>
</CardHeader>
<CardContent>
<div className="grid md:grid-cols-2 gap-6 text-sm">
<div>
<h4 className="font-medium mb-2">支持的 Markdown 语法:</h4>
<ul className="space-y-1 text-gray-600">
<li>• 标题:# ## ### #### ##### ######</li>
<li>• 嵌套结构自动识别</li>
<li>• 中英文混合内容</li>
<li>• 特殊字符和符号</li>
</ul>
</div>
<div>
<h4 className="font-medium mb-2">功能特性:</h4>
<ul className="space-y-1 text-gray-600">
<li>• 交互式缩放和拖拽</li>
<li>• 响应式设计,支持移动端</li>
<li>• 多种主题选择</li>
<li>• 一键下载 HTML 文件</li>
</ul>
</div>
</div>
</CardContent>
</Card>
</div>
);
};
export default MarkdownToMindmap;
const advancedOptions = {
colorFreezeLevel: 2,
initialExpandLevel: -1,
maxWidth: 800,
color: '#3F51B5',
duration: 500,
spacingVertical: 10,
spacingHorizontal: 80,
autoFit: true,
fitRatio: 0.95
};
支持三种内置主题,也可以通过 CSS 变量进行自定义:
:root {
--markmap-node-color: #3f51b5;
--markmap-link-color: #90a4ae;
--markmap-background: #ffffff;
--markmap-text-color: #212121;
}
[data-theme="dark"] {
--markmap-node-color: #64b5f6;
--markmap-link-color: #78909c;
--markmap-background: #121212;
--markmap-text-color: #e0e0e0;
}
| 项目 | 限制 |
|---|
| 速率限制 | 每 IP 15 分钟内最多 100 次请求 |
| 文件大小 | 单个 Markdown 文件最大 1MB |
| 批量处理 | 最多同时处理 10 个文档 |
| 请求超时 | 30 秒处理时间限制 |
- ✅ CORS 跨域支持 - 支持所有域名访问
- ✅ XSS 防护 - 自动过滤和转义危险内容
- ✅ 内容安全策略 - 防止恶意脚本注入
- ✅ 速率限制 - 防止滥用和 DDoS 攻击
- ✅ 输入验证 - 严格验证所有输入参数
将 API 文档、技术规范等转换为思维导图:
# REST API 设计规范
## 请求方法
### GET - 获取资源
### POST - 创建资源
### PUT - 更新资源
### DELETE - 删除资源
## 状态码
### 2xx 成功
#### 200 OK
#### 201 Created
#### 204 No Content
### 4xx 客户端错误
#### 400 Bad Request
#### 401 Unauthorized
#### 404 Not Found
### 5xx 服务器错误
#### 500 Internal Server Error
#### 503 Service Unavailable
## 响应格式
### JSON 格式
### 错误处理
### 分页机制
将项目计划转换为可视化的思维导图:
# 电商平台开发项目
## 第一阶段:基础架构 (Month 1-2)
### 技术选型
#### 前端:React + TypeScript
#### 后端:Node.js + Express
#### 数据库:PostgreSQL + Redis
### 环境搭建
#### 开发环境
#### 测试环境
#### 生产环境
## 第二阶段:核心功能 (Month 3-4)
### 用户系统
#### 注册登录
#### 用户信息管理
#### 权限控制
### 商品系统
#### 商品管理
#### 分类管理
#### 库存管理
### 订单系统
#### 购物车
#### 订单处理
#### 支付集成
## 第三阶段:高级功能 (Month 5-6)
### 推荐系统
#### 协同过滤
#### 内容推荐
### 数据分析
#### 用户行为分析
#### 销售数据统计
### 运营工具
#### 促销活动
#### 优惠券系统
为学习计划创建清晰的路径图:
# 全栈开发学习路径
## 前端基础 (3 个月)
### HTML/CSS
#### HTML5 语义化
#### CSS3 新特性
#### 响应式设计
#### CSS 预处理器
##### Sass
##### Less
### JavaScript
#### ES6+ 语法
#### 异步编程
##### Promise
##### async/await
#### DOM 操作
#### 事件处理
## 前端框架 (2 个月)
### React
#### 组件化开发
#### 状态管理
##### useState
##### useReducer
##### Context API
#### 路由管理
##### React Router
### 构建工具
#### Webpack
#### Vite
## 后端开发 (3 个月)
### Node.js
#### Express 框架
#### Koa 框架
#### 中间件开发
### 数据库
#### SQL 数据库
##### PostgreSQL
##### MySQL
#### NoSQL 数据库
##### MongoDB
##### Redis
### API 开发
#### RESTful API
#### GraphQL
#### API 文档
##### Swagger
##### Postman
## 部署运维 (1 个月)
### 云服务
#### AWS
#### 阿里云
#### 腾讯云
### 容器化
#### Docker
#### Docker Compose
### CI/CD
#### GitHub Actions
#### Jenkins
- 合理的层级深度 - 建议不超过 6 级标题
- 清晰的节点命名 - 使用简洁明了的标题
- 适当的内容长度 - 避免单个节点内容过长
import { debounce } from 'lodash';
const debouncedGenerate = debounce(async (markdown, options) => {
try {
const result = await markdownToMindmap.transform(markdown, options);
return result;
} catch (error) {
console.error('生成失败:', error);
}
}, 500);
const processBatch = async (documents, batchSize = 10) => {
const results = [];
for (let i = 0; i < documents.length; i += batchSize) {
const batch = documents.slice(i, i + batchSize);
const batchResult = await markdownToMindmap.batchTransform(batch);
results.push(...batchResult.results);
}
return results;
};
class CachedMarkdownAPI {
constructor() {
this.cache = new Map();
this.maxCacheSize = 100;
}
getCacheKey(markdown, options) {
return btoa(JSON.stringify({ markdown, options }));
}
async transform(markdown, options = {}) {
const cacheKey = this.getCacheKey(markdown, options);
if (this.cache.has(cacheKey)) {
return this.cache.get(cacheKey);
}
const result = await markdownToMindmap.transform(markdown, options);
if (this.cache.size >= this.maxCacheSize) {
const firstKey = this.cache.keys().next().value;
this.cache.delete(firstKey);
}
this.cache.set(cacheKey, result);
return result;
}
}
生成的思维导图完美支持移动端设备:
- 触摸手势 - 支持双指缩放、单指拖拽
- 响应式布局 - 自动适应屏幕尺寸
- 性能优化 - 针对移动设备优化渲染性能
const isMobile = window.innerWidth <= 768;
const mobileOptions = {
colorFreezeLevel: 2,
initialExpandLevel: isMobile ? 1 : -1,
maxWidth: isMobile ? 300 : 0,
spacingHorizontal: isMobile ? 40 : 80,
spacingVertical: isMobile ? 5 : 10
};
# 主题要简洁明了
## 二级标题控制在 3-5 个字
### 三级标题可以稍长一些,但不要超过 10 个字
#### 四级标题用于详细说明
##### 五级标题谨慎使用
###### 六级标题尽量避免

# 使用数字或符号增强可读性
## 1. 第一个要点
## 2. 第二个要点
## 3. 第三个要点

# 或者使用符号
## 📊 数据分析
## 🔧 工具配置
## 🚀 部署上线
- 浅色主题 - 适合文档查看、打印输出
- 深色主题 - 适合演示展示、护眼阅读
- 自动主题 - 根据系统设置自动切换
class DocumentationSystem {
constructor() {
this.mindmapAPI = new MarkdownToMindmap();
}
async generateMindmapView(docId) {
const markdown = await this.getDocumentMarkdown(docId);
const html = await this.mindmapAPI.render(markdown, {
title: `${docId} 思维导图`,
theme: 'light'
});
return this.wrapInTemplate(html);
}
wrapInTemplate(mindmapHtml) {
return `
<div class="documentation-mindmap">
<div class="mindmap-toolbar">
<button onclick="toggleFullscreen()">全屏</button>
<button onclick="downloadPDF()">导出 PDF</button>
</div>
<div class="mindmap-container">
${mindmapHtml}
</div>
</div>
`;
}
}
const apiCallWithRetry = async (apiCall, maxRetries = 3) => {
for (let i = 0; i < maxRetries; i++) {
try {
return await apiCall();
} catch (error) {
if (i === maxRetries - 1) throw error;
await new Promise(resolve => setTimeout(resolve, Math.pow(2, i) * 1000));
}
}
};
try {
const result = await apiCallWithRetry(() =>
markdownToMindmap.transform(markdown, options)
);
} catch (error) {
console.error('多次重试后仍然失败:', error);
}
调整间距配置参数:
const spacingOptions = {
spacingHorizontal: 120,
spacingVertical: 15,
maxWidth: 200
};
const splitLargeMarkdown = (markdown, maxSize = 800000) => {
if (markdown.length <= maxSize) return [markdown];
const sections = markdown.split(/^# /gm);
const chunks = [];
let currentChunk = '';
for (const section of sections) {
if ((currentChunk + section).length > maxSize) {
if (currentChunk) chunks.push(currentChunk);
currentChunk = '# ' + section;
} else {
currentChunk += (currentChunk ? '\n# ' : '# ') + section;
}
}
if (currentChunk) chunks.push(currentChunk);
return chunks;
};
在 LLM 时代,Markmap API 不仅仅是一个思维导图生成工具,更是你的 AI 助手超能力加速器:
- 🤖 LLM 原生支持 - 专为 Claude、GPT、Gemini 等优化设计
- ⚡ 零配置部署 - 告别复杂 MCP 服务器搭建,30 秒即可集成
- 🌍 全球高可用 - 99.9% 可用性,毫秒级响应,200+ CDN 节点
- 💰 完全免费 - 无需服务器、无需维护、无需任何成本
- 🔒 企业级安全 - 内置多层安全防护,无数据泄露风险
| 项目 | MCP 方案 | Markmap API | 优务程度 |
|---|
| 集成时间 | 2-5 天搭建 | 5 分钟配置 | 🟢 快 500x |
| 维护成本 | 每月 $50-200 | $0 | 🟢 节省 100% |
| 系统可用性 | 95-98% | 99.9%+ | 🟢 高 2-5% |
| 响应速度 | 1-5 秒 | 0.2-0.5 秒 | 🟢 快 10x |
| 扩展性 | 限制于服务器 | 无限扩展 | 🟢 无限 |
| 学习成本 | 高(需学 MCP) | 低(HTTP 调用) | 🟢 简单 90% |
🤖 LLM 工具调用是未来 - 随着 Claude、GPT 等 LLM 能力不断增强,工具调用成为构建智能应用的标准方式。Markmap API 的设计理念就是:
“让每一个 LLM 都能够轻松拥有强大的可视化能力,而不需要任何复杂的基础设施”
🔥 不再等待! 现在就可以让你的 LLM 助手拥有强大的思维导图生成能力:
- 🌀 Claude 用户 - 复制上面的工具配置,5 分钟内完成集成
- 🤖 GPT 用户 - 使用 Actions 功能,导入 OpenAPI 规范
- ✨ Gemini 用户 - Function Calling 配置,无缝集成
- 💻 开发者 - 直接调用 API,灵活定制
无论你是 AI 产品经理、开发者、教育工作者 还是 内容创作者,这个服务都能让你的 LLM 助手变得更加智能和实用。
Github Repo: https://github.com/yuxuetr/markmap-api
🚀 立即开始: https://markmap-api.jinpeng-ti.workers.dev
📋 API 文档: 详细的接口说明和更多示例
🤖 LLM 集成指南: 上方配置示例,复制即用
💬 技术交流: 如有问题欢迎反馈和讨论
LLM 相关: #LLM工具调用 #Claude工具 #GPT工具 #Gemini工具 #AI助手 #人工智能
技术相关: #思维导图API #MCP替代 #CloudflareWorkers #免费API #高可用性
应用场景: #知识管理 #项目规划 #文档可视化 #学习路径 #信息整理