9 posts tagged with "深度学习"

View All Tags

2024年标志着Burn架构的重大演变。 传统的深度学习框架常常要求开发者在性能、可移植性和灵活性之间做出妥协;而我们的目标是超越这些权衡。 展望2025年,我们致力于将这一理念应用于整个计算栈,从嵌入式设备到数据中心,涵盖所有领域。

2024年回顾:突破硬件限制

重新定义内核开发

今年之初,我们面临一个限制:我们的WGPU后端依赖于基础的WGSL模板,限制了我们的适应能力。这个挑战促使我们创建了CubeCL [1],这是我们统一内核开发的解决方案。这项任务非常复杂——设计一个抽象层,适用于各种不同的硬件,同时保持顶级性能。我们的结果证明了这一策略的有效性,在大多数基准测试中,性能现在已匹配甚至超过LibTorch。

多后端架构

后端生态系统现已包括CUDA [2]、HIP/ROCm [3]以及支持WebGPU和Vulkan的先进WGPU实现 [4]。迄今为止最显著的成就是在相同硬件上实现不同后端的性能平衡。例如,无论是在CUDA还是Vulkan上执行矩阵乘法操作,性能几乎相同,这直接反映了我们平台无关优化的策略。

我们还引入了新的Router和HTTP后端:Router后端支持多后端的动态混合,而HTTP后端则支持跨多台机器的分布式处理。为了解决内存管理挑战,我们实施了池化和检查点机制,即使在反向传播期间也能实现操作融合。

硬件无关加速

我们的硬件加速策略标志着一个重要的技术里程碑。我们并不依赖于特定平台的库,如cuBLAS [5]或rocBLAS [6],而是开发了一套编译器栈,利用每个平台的最佳特性,同时确保跨平台的兼容性。这涉及克服代码生成和优化中的复杂挑战,尤其是对于矩阵乘法等操作,必须高效利用各种硬件架构的张量核心。

2025年路线图:拥抱极端

在2025年,我们将解决深度学习部署中的两个基本挑战。

小规模:量化

量化对于资源有限的计算至关重要。 我们的方法使用复杂操作的融合,通过“读取时融合”功能,实现如归约等任务在计算管道中的无缝集成。 这种融合策略自动处理操作的打包和解包,确保量化操作高效运行,无需手动调整。 结果是什么?高性能的量化操作在保持精度的同时,降低了资源需求。

大规模:可扩展的分布式计算

在另一端,是分布式计算。 通过利用我们的Router和HTTP后端构建强大的分布式训练基础设施,我们旨在创建一个流畅的分布式计算体验, 使工作负载能够在不同硬件和后端配置之间轻松流动,同时优化异构计算环境中的资源利用。

为了支持这种普遍兼容性的愿景,我们正在扩展我们的后端生态系统,包括:

  • 开发Metal后端,充分利用Apple Silicon的能力,超越当前WGPU的功能;
  • 在Rust中实现一个即时向量化的CPU后端,以增强CPU性能;
  • 开启新的后端可能性,如FPGA支持,确保Burn能够适应任何计算环境。

我们还将大量投资于开发者体验,提供全面的CubeCL文档,并推动Burn API的稳定化。这些改进将使开发者更容易利用我们跨平台能力的全部潜力。

在2024年,我们证明了跨平台性能不需要妥协。 展望2025年,我们将这一原则扩展到整个计算领域——从微控制器到服务器农场。 通过解决两个极端的技术挑战,我们致力于使深度学习在任何规模或硬件限制下都更加高效和易用。

参考文献

鱼雪

在深度学习和计算机视觉领域,目标检测是一个至关重要的任务。 面对日益增长的实时性和性能要求,将已经训练好的模型高效部署到实际环境中是极大的挑战。 TensorRT作为NVIDIA提供的高性能推理引擎,能够显著提升模型在GPU上的推理速度。 通过将ONNX格式的模型转换为TensorRT引擎,再使用TensorRT执行推理过程,我们可以轻松获得更高的吞吐量和更低的延迟。

本篇教程将详细介绍如何将ONNX模型导出到TensorRT引擎,并使用TensorRT对目标检测模型进行高效推理。 我们将从环境准备、代码示例到优化建议,为您展示完整的实现路径。

目录

为什么选择TensorRT?

TensorRT 是NVIDIA推出的深度学习推理优化工具,可以充分发挥NVIDIA GPU的计算能力。 TensorRT通过层融合、FP16/INT8量化、优化内存访问和内核自动选择等手段,在保持模型精度的同时大幅缩短推理延迟,提升吞吐量。

选择TensorRT的理由包括:

  1. 高性能:利用GPU硬件特性,将推理速度提升数倍。
  2. 多框架支持:支持从ONNX、PyTorch、TensorFlow等框架导出的模型。
  3. 灵活精度支持:可选择FP32、FP16或INT8,达到性能与精度的平衡。
  4. 易于集成:提供Python和C++ API,方便与现有代码库整合。

环境准备

在开始之前,请确保已安装以下组件:

  • Python 3.7+
  • TensorRT(请参考NVIDIA官方文档进行安装)
  • pycudaNumPyOpenCV

使用pip安装所需Python依赖:

pip install pycuda numpy opencv-python tensorrt==10.7.0

从ONNX导出TensorRT引擎

下面的代码示例展示了如何从ONNX模型构建TensorRT引擎。请根据您的实际模型输入名称和形状进行修改。

import tensorrt as trt

def build_engine(onnx_file_path, trt_model_path, max_workspace_size=1 << 30, fp16_mode=True):
TRT_LOGGER = trt.Logger(trt.Logger.WARNING)
builder = trt.Builder(TRT_LOGGER)
network = builder.create_network(flags=1 << int(trt.NetworkDefinitionCreationFlag.EXPLICIT_BATCH))
parser = trt.OnnxParser(network, TRT_LOGGER)

with open(onnx_file_path, 'rb') as model:
if not parser.parse(model.read()):
print("ERROR: Failed to parse the ONNX file.")
for error in range(parser.num_errors):
print(parser.get_error(error))
return None

config = builder.create_builder_config()
config.set_memory_pool_limit(trt.MemoryPoolType.WORKSPACE, max_workspace_size)

if fp16_mode and builder.platform_has_fast_fp16:
config.set_flag(trt.BuilderFlag.FP16)

profile = builder.create_optimization_profile()

# 根据您的模型输入名称和形状进行调整
input_name = "input"
min_shape = (1, 3, 640, 640)
opt_shape = (1, 3, 640, 640)
max_shape = (1, 3, 640, 640)
profile.set_shape(input_name, min_shape, opt_shape, max_shape)
config.add_optimization_profile(profile)

serialized_engine = builder.build_serialized_network(network, config)
if serialized_engine is None:
print("Failed to build serialized engine.")
return None

with open(trt_model_path, 'wb') as f:
f.write(serialized_engine)
print(f"TensorRT engine saved as {trt_model_path}")

runtime = trt.Runtime(TRT_LOGGER)
engine = runtime.deserialize_cuda_engine(serialized_engine)
return engine

# 示例调用
onnx_model_path = '/path/to/best.onnx'
trt_model_path = '/path/to/best.trt'
engine = build_engine(onnx_model_path, trt_model_path, fp16_mode=True)

通过上述代码,您可以将ONNX模型转换为TensorRT引擎文件,从而在后续推理中加载并使用该引擎。

TensorRT推理流程

在获得TensorRT引擎后,我们即可使用TensorRT完成高效的目标检测推理。以下代码示例展示了从引擎加载、图像预处理、推理执行到后处理及可视化的完整流程。

代码解析与示例

导入与类别定义

import cv2
import numpy as np
import hashlib
import tensorrt as trt
import pycuda.driver as cuda
import pycuda.autoinit
import time

CLASSES = [
'book', 'bottle', 'cellphone', 'drink', 'eat', 'face',
'food', 'head', 'keyboard', 'mask', 'person', 'talk'
]

def name_to_color(name):
hash_str = hashlib.md5(name.encode('utf-8')).hexdigest()
r = int(hash_str[0:2],16)
g = int(hash_str[2:4],16)
b = int(hash_str[4:6],16)
return (b,g,r)

辅助函数

包括激活函数、坐标转换、IoU计算和前后处理辅助方法。

def sigmoid(x):
return 1/(1+np.exp(-x))

def xywh2xyxy(x):
y = np.copy(x)
y[...,0] = x[...,0]-x[...,2]/2
y[...,1] = x[...,1]-x[...,3]/2
y[...,2] = x[...,0]+x[...,2]/2
y[...,3] = x[...,1]+x[...,3]/2
return y

def compute_iou(box, boxes):
xmin = np.maximum(box[0], boxes[:,0])
ymin = np.maximum(box[1], boxes[:,1])
xmax = np.minimum(box[2], boxes[:,2])
ymax = np.minimum(box[3], boxes[:,3])

inter_w = np.maximum(0, xmax - xmin)
inter_h = np.maximum(0, ymax - ymin)
intersection = inter_w*inter_h

box_area = (box[2]-box[0])*(box[3]-box[1])
boxes_area = (boxes[:,2]-boxes[:,0])*(boxes[:,3]-boxes[:,1])

union = box_area+boxes_area-intersection
iou = intersection/union
return iou

引擎加载与内存分配

加载TensorRT引擎,并分配内存。

  • load_engine: 函数用于加载TensorRT引擎,并返回引擎对象。
  • allocate_buffers: 函数用于分配输入和输出缓冲区,并返回输入、输出和流对象。

为什么需要分配内存?

  • 输入缓冲区:用于存储输入数据。
  • 输出缓冲区:用于存储输出数据。
  • 流对象:用于管理CUDA流,确保输入和输出数据在GPU上正确传输。
def load_engine(trt_engine_path):
TRT_LOGGER = trt.Logger(trt.Logger.WARNING)
runtime = trt.Runtime(TRT_LOGGER) # 创建TensorRT运行时对象
try:
with open(trt_engine_path,'rb') as f:
engine = runtime.deserialize_cuda_engine(f.read()) # 反序列化引擎,将引擎从文件中加载到内存中,加载到引擎对象中
print(f"成功加载引擎: {trt_engine_path}")
return engine
except Exception as e:
print(f"Failed to deserialize the engine: {e}")
return None

def allocate_buffers(engine, context, batch_size=1):
inputs = [] # 输入缓冲区
outputs = [] # 输出缓冲区
stream = cuda.Stream() # 创建CUDA流对象

for i in range(engine.num_io_tensors):
name = engine.get_tensor_name(i) # 获取张量名称
dtype = trt.nptype(engine.get_tensor_dtype(name)) # 获取张量数据类型
mode = engine.get_tensor_mode(name) # 获取张量模式
is_input = (mode == trt.TensorIOMode.INPUT) # 判断是否为输入张量

shape = engine.get_tensor_shape(name) # 获取张量形状
print(f"Binding {i}: Name={name}, Shape={shape}, Dtype={dtype}, Input={is_input}")
size = trt.volume(shape) # 计算张量大小
host_mem = cuda.pagelocked_empty(size, dtype) # 创建主机内存
device_mem = cuda.mem_alloc(host_mem.nbytes) # 分配设备内存

if is_input:
inputs.append({'name':name,'host':host_mem,'device':device_mem,'shape':shape}) # 添加输入张量
else:
outputs.append({'name':name,'host':host_mem,'device':device_mem,'shape':shape}) # 添加输出张量

return inputs, outputs, stream

预处理图像与推理执行

def preprocess_image(img_path, input_width, input_height):
image = cv2.imread(img_path)
if image is None:
raise FileNotFoundError(f"图像未找到: {img_path}")
original_height, original_width = image.shape[:2]
image_rgb = cv2.cvtColor(image,cv2.COLOR_BGR2RGB)
resized = cv2.resize(image_rgb,(input_width,input_height))
input_image = resized.astype(np.float32)/255.0
input_image = input_image.transpose(2,0,1)
input_tensor = np.expand_dims(input_image,0)
return image,input_tensor,original_width,original_height

def do_inference(context,inputs,outputs,stream):
for inp in inputs:
context.set_tensor_address(inp['name'],int(inp['device'])) # 设置输入张量地址
cuda.memcpy_htod_async(inp['device'],inp['host'],stream) # 将输入数据从主机内存复制到设备内存

for out in outputs:
context.set_tensor_address(out['name'],int(out['device'])) # 设置输出张量地址

context.execute_async_v3(stream_handle=stream.handle) # 异步执行推理

for out in outputs:
cuda.memcpy_dtoh_async(out['host'],out['device'],stream) # 将输出数据从设备内存复制到主机内存

stream.synchronize() # 同步CUDA流

return [out['host'] for out in outputs] # 返回输出数据

后处理与NMS以及可视化

def postprocess(outputs, original_width, original_height, input_width, input_height, conf_threshold=0.7, iou_threshold=0.5):
output = outputs[0]
print(f"输出总元素数: {output.size}")
expected_shape = (1,16,8400)

if output.size != np.prod(expected_shape):
print(f"无法将输出重塑为 {expected_shape}")
return [],[],[]

output = output.reshape(expected_shape)
print(f"输出重塑后的形状: {output.shape}")

predictions = np.squeeze(output,axis=0).T
print(f"总预测数量: {predictions.shape[0]}")

boxes = predictions[:,:4] # 获取预测框
class_scores = sigmoid(predictions[:,4:]) # 获取类别得分
class_ids = np.argmax(class_scores,axis=1) # 获取类别ID
confidences = np.max(class_scores,axis=1) # 获取置信度

mask = confidences>conf_threshold # 获取置信度大于阈值的掩码
boxes = boxes[mask] # 获取置信度大于阈值的预测框
confidences = confidences[mask] # 获取置信度大于阈值的置信度
class_ids = class_ids[mask] # 获取置信度大于阈值的类别ID

print(f"应用置信度阈值后: {boxes.shape[0]} 个框")
if len(confidences)>0:
print(f"置信度分布: 最小={confidences.min():.4f},最大={confidences.max():.4f},平均={confidences.mean():.4f}")

if len(boxes)==0:
return [],[],[]

boxes_xyxy = xywh2xyxy(boxes) # 将预测框从xywh格式转换为xyxy格式
scale_w = original_width/input_width # 计算缩放比例
scale_h = original_height/input_height # 计算缩放比例
boxes_xyxy[:,[0,2]]*=scale_w # 缩放预测框
boxes_xyxy[:,[1,3]]*=scale_h # 缩放预测框
boxes_xyxy = boxes_xyxy.astype(np.int32) # 将预测框转换为整数类型

final_boxes=[]
final_confidences=[]
final_class_ids=[]
unique_classes = np.unique(class_ids)
for cls in unique_classes:
cls_mask = (class_ids==cls) # 获取类别ID等于cls的掩码
cls_boxes = [boxes_xyxy[i] for i in range(len(class_ids)) if cls_mask[i]] # 获取类别ID等于cls的预测框
cls_scores = [confidences[i] for i in range(len(class_ids)) if cls_mask[i]] # 获取类别ID等于cls的置信度
if len(cls_boxes)==0:
continue
cls_boxes_xywh=[]
for box in cls_boxes:
x1,y1,x2,y2=box
cls_boxes_xywh.append([x1,y1,x2-x1,y2-y1]) # 将预测框从xyxy格式转换为xywh格式

indices = cv2.dnn.NMSBoxes(cls_boxes_xywh,cls_scores,conf_threshold,iou_threshold) # 应用非极大值抑制
if len(indices)>0:
for i in indices.flatten():
final_boxes.append(cls_boxes[i]) # 添加最终预测框
final_confidences.append(cls_scores[i]) # 添加最终置信度
final_class_ids.append(cls) # 添加最终类别ID

print(f"应用NMS后: {len(final_boxes)} 个框")
return final_boxes,final_confidences,final_class_ids

def visualize(image, boxes, confidences, class_ids, output_path='result.jpg'):
image_draw = image.copy()
for (bbox,score,cls_id) in zip(boxes,confidences,class_ids):
x1,y1,x2,y2 = bbox
cls_name = CLASSES[cls_id]
label = f"{cls_name}:{score:.2f}"
color = name_to_color(cls_name)
cv2.rectangle(image_draw,(x1,y1),(x2,y2),color,2)
(lw,lh),_ = cv2.getTextSize(label,cv2.FONT_HERSHEY_SIMPLEX,0.5,1)
cv2.rectangle(image_draw,(x1,y1-lh-10),(x1+lw,y1),color,-1)
cv2.putText(image_draw,label,(x1,y1-5),
cv2.FONT_HERSHEY_SIMPLEX,0.5,(0,0,0),1)
cv2.imwrite(output_path,image_draw)
print(f"推理完成,结果已保存为 {output_path}")

完整预测流程

def predict(trt_path, img_path, output_path, conf_threshold=0.6, iou_threshold=0.5):
engine = load_engine(trt_path)
if engine is None:
print("加载引擎失败。")
return
context = engine.create_execution_context()

input_idx=0
input_name = engine.get_tensor_name(input_idx)
input_shape = engine.get_binding_shape(input_idx)
print(f"输入张量名称: {input_name}")
print(f"输入张量形状: {input_shape}")

batch_size=1
inputs, outputs, stream = allocate_buffers(engine, context, batch_size=batch_size)
input_height, input_width = input_shape[2],input_shape[3]
print(f"模型输入尺寸: {input_width}x{input_height}")

image,input_tensor,original_width,original_height = preprocess_image(img_path,input_width,input_height)
np.copyto(inputs[0]['host'],np.ascontiguousarray(input_tensor.ravel()))
print("输入数据已拷贝到主机缓冲区。")

start_time=time.time()
output_data = do_inference(context,inputs,outputs,stream)
end_time=time.time()
print(f"预测花费时间: {end_time - start_time:.4f} 秒")

boxes, confidences, class_ids = postprocess(
output_data,
original_width=original_width,
original_height=original_height,
input_width=input_width,
input_height=input_height,
conf_threshold=conf_threshold,
iou_threshold=iou_threshold
)

if len(boxes)==0:
print("未检测到任何目标。")
return

visualize(image, boxes, confidences, class_ids, output_path=output_path)


if __name__=='__main__':
trt_path = '/path/to/best.trt'
img_path = '/path/to/image.jpg'
output_path='result.jpg'
predict(trt_path,img_path,output_path)

YOLO TensorRT的检测结果

性能优化建议

  1. 启用FP16或INT8精度:在构建引擎时启用FP16或INT8,可在保证一定精度的前提下显著加速推理。
  2. 动态形状优化:为输入创建优化配置文件(Profile),根据实际输入大小调整,提升性能和灵活性。
  3. 批量推理:如果需要处理多张图像,可在构建时设置多批次输入,提升吞吐量。
  4. 选择合适硬件:在高性能GPU上运行,充分利用TensorRT特性。

总结

本文详细介绍了使用TensorRT对目标检测模型进行加速推理的完整流程,包括:

  • 从ONNX模型导出到TensorRT引擎
  • 使用TensorRT加载引擎与分配缓冲区
  • 预处理输入图像并执行快速推理
  • 后处理结果并可视化检测框

通过合适的优化策略和硬件支持,TensorRT能够为深度学习推理提供显著的性能提升,从而满足实时目标检测应用的高要求。 希望本文能为您部署和优化深度学习模型提供有价值的参考。

鱼雪

在计算机视觉领域,目标检测是深度学习中的核心任务之一,广泛应用于安防监控、工业检测、自动驾驶和智能零售等多个场景。 随着模型的不断进化与优化,如何在实际部署中充分利用硬件和软件资源,加速推理性能成为关键需求。 OpenVINO作为英特尔推出的高性能推理工具,能有效加速深度学习模型的推理过程。本文将详细介绍如何使用OpenVINO Runtime对目标检测模型进行推理, 并通过实例代码向您展示从数据预处理、模型加载、推理到后处理和结果可视化的完整流程。

为什么选择OpenVINO?

OpenVINO(Open Visual Inference & Neural Network Optimization)是英特尔提供的深度学习推理和优化工具套件。与传统的推理框架相比,OpenVINO具有以下优势:

  1. 跨平台与多硬件支持:支持在CPU、GPU、VPU以及FPGA等多种硬件设备上进行推理,加速多元化的应用场景。
  2. 高性能推理:通过模型优化和低精度推理(如FP16、INT8量化),OpenVINO可大幅降低推理延迟,提高吞吐量。
  3. 丰富的API和工具:为开发者提供了易于使用的Python API和C++接口,方便快速集成和部署。
  4. 广泛的模型支持:兼容ONNX、TensorFlow、PyTorch等主流框架导出的模型,降低迁移成本。

环境准备

开始之前,请确保您已安装以下依赖:

  • Python 3.7+
  • OpenVINO Runtime(可参考官方文档
  • OpenCV
  • NumPy

使用pip安装必要的依赖:

pip install openvino opencv-python numpy
note

如果要转换ONNX模型为OpenVINO,则需要安装openvino-dev包。

pip install openvino-dev

代码详解

下面的示例代码展示了如何使用OpenVINO进行目标检测推理。请根据实际需求自行修改路径和参数。

导入必要的库

import cv2
import numpy as np
import hashlib
from openvino.runtime import Core
  • cv2:用于图像预处理和可视化。
  • numpy:用于数据处理和数值计算。
  • hashlib:用于生成类别对应的颜色哈希值。
  • openvino.runtime.Core:用于加载和编译OpenVINO模型,执行推理任务。

定义类别和颜色映射

# 定义12个类别
CLASSES = [
'book', 'bottle', 'cellphone', 'drink', 'eat', 'face',
'food', 'head', 'keyboard', 'mask', 'person', 'talk'
]

def name_to_color(name):
# 使用哈希为每个类别生成唯一颜色
hash_str = hashlib.md5(name.encode('utf-8')).hexdigest()
r = int(hash_str[0:2], 16)
g = int(hash_str[2:4], 16)
b = int(hash_str[4:6], 16)
return (r, g, b)

通过哈希生成稳定的颜色映射,确保多次运行中同一类别颜色一致。

辅助函数

包括Sigmoid激活函数、坐标转换和IoU计算等常用操作。

def sigmoid(x):
return 1 / (1 + np.exp(-x))

def xywh2xyxy(x):
y = np.copy(x)
y[..., 0] = x[..., 0] - x[..., 2]/2
y[..., 1] = x[..., 1] - x[..., 3]/2
y[..., 2] = x[..., 0] + x[..., 2]/2
y[..., 3] = x[..., 1] + x[..., 3]/2
return y

def compute_iou(box, boxes):
xmin = np.maximum(box[0], boxes[:, 0])
ymin = np.maximum(box[1], boxes[:, 1])
xmax = np.minimum(box[2], boxes[:, 2])
ymax = np.minimum(box[3], boxes[:, 3])

inter_w = np.maximum(0, xmax - xmin)
inter_h = np.maximum(0, ymax - ymin)
intersection = inter_w * inter_h

box_area = (box[2]-box[0])*(box[3]-box[1])
boxes_area = (boxes[:,2]-boxes[:,0])*(boxes[:,3]-boxes[:,1])

union = box_area + boxes_area - intersection
iou = intersection / union
return iou

模型加载

使用OpenVINO Runtime加载并编译模型。

def load_model(model_path, device='CPU'):
ie = Core()
model = ie.read_model(model_path)
compiled_model = ie.compile_model(model=model, device_name=device)
input_layer = compiled_model.inputs[0]
output_layer = compiled_model.outputs[0]
input_shape = input_layer.shape
return compiled_model, input_layer, output_layer, input_shape
  • load_model:读取并编译模型,可选择设备(如CPU、GPU)。
  • input_layeroutput_layer:获取模型输入输出层信息,用于推理时的数据输入输出操作。

图像预处理

将输入图像转换为模型所需的格式。

def preprocess_image(image_path, input_width, input_height):
image = cv2.imread(image_path)
if image is None:
raise FileNotFoundError(f"图像未找到: {image_path}")
original_height, original_width = image.shape[:2]
image_rgb = cv2.cvtColor(image, cv2.COLOR_BGR2RGB)
resized = cv2.resize(image_rgb, (input_width, input_height))
input_image = resized.astype(np.float32)/255.0
input_image = input_image.transpose(2,0,1)
input_tensor = np.expand_dims(input_image, 0)
return image, input_tensor, original_width, original_height

后处理与NMS

对模型输出结果进行解析、阈值筛选和NMS去重。

def postprocess(outputs, original_width, original_height, input_width, input_height, conf_threshold=0.7, iou_threshold=0.5):
predictions = np.squeeze(outputs, axis=0).T

print(f"总预测数量: {predictions.shape[0]}")

boxes = predictions[:, :4]
class_scores = sigmoid(predictions[:, 4:])
class_ids = np.argmax(class_scores, axis=1)
confidences = np.max(class_scores, axis=1)

mask = confidences > conf_threshold
boxes = boxes[mask]
confidences = confidences[mask]
class_ids = class_ids[mask]

print(f"应用置信度阈值后: {boxes.shape[0]} 个框")
if len(confidences) > 0:
print(f"置信度分布: 最小={confidences.min():.4f}, 最大={confidences.max():.4f}, 平均={confidences.mean():.4f}")

if len(boxes) == 0:
return [], [], []

boxes_xyxy = xywh2xyxy(boxes)
scale_w = original_width/input_width
scale_h = original_height/input_height
boxes_xyxy[:, [0,2]] *= scale_w
boxes_xyxy[:, [1,3]] *= scale_h
boxes_xyxy = boxes_xyxy.astype(np.int32)

boxes_list = boxes_xyxy.tolist()
scores_list = confidences.tolist()

final_boxes = []
final_confidences = []
final_class_ids = []

unique_classes = np.unique(class_ids)
for cls in unique_classes:
cls_mask = (class_ids==cls)
cls_boxes = [boxes_list[i] for i in range(len(class_ids)) if cls_mask[i]]
cls_scores = [scores_list[i] for i in range(len(class_ids)) if cls_mask[i]]

if len(cls_boxes)==0:
continue

cls_boxes_xywh = []
for box in cls_boxes:
x1,y1,x2,y2 = box
cls_boxes_xywh.append([x1,y1,x2-x1,y2-y1])

indices = cv2.dnn.NMSBoxes(cls_boxes_xywh, cls_scores, conf_threshold, iou_threshold)

if len(indices)>0:
for i in indices.flatten():
final_boxes.append(cls_boxes[i])
final_confidences.append(cls_scores[i])
final_class_ids.append(cls)

print(f"应用NMS后: {len(final_boxes)} 个框")

return final_boxes, final_confidences, final_class_ids

可视化结果

在原图上绘制检测结果。

def visualize(image, boxes, confidences, class_ids, output_path='result.jpg'):
image_draw = image.copy()
for (bbox, score, cls_id) in zip(boxes, confidences, class_ids):
x1,y1,x2,y2 = bbox
cls_name = CLASSES[cls_id]
label = f"{cls_name}:{score:.2f}"
color = name_to_color(cls_name)
cv2.rectangle(image_draw, (x1,y1), (x2,y2), color, 2)
(lw, lh), _ = cv2.getTextSize(label, cv2.FONT_HERSHEY_SIMPLEX,0.5,1)
cv2.rectangle(image_draw, (x1, y1 - lh -10), (x1+lw,y1), color, -1)
cv2.putText(image_draw, label, (x1,y1-5), cv2.FONT_HERSHEY_SIMPLEX,0.5,(0,0,0),1)
cv2.imwrite(output_path, image_draw)
print(f"推理完成,结果已保存为 {output_path}")

完整预测流程

将上述步骤整合到predict函数中。

def predict(model_path, image_path, output_image_file, conf_threshold=0.6, iou_threshold=0.5):

# 加载模型
compiled_model, input_layer, output_layer, input_shape = load_model(model_path, device='CPU')
_, _, input_height, input_width = input_shape

# 预处理图像
image, input_tensor, original_width, original_height = preprocess_image(image_path, input_width, input_height)

# 推理
results = compiled_model([input_tensor])
outputs = results[output_layer]

# 后处理
boxes, confidences, class_ids = postprocess(
outputs,
original_width=original_width,
original_height=original_height,
input_width=input_width,
input_height=input_height,
conf_threshold=conf_threshold,
iou_threshold=iou_threshold
)

if len(boxes)==0:
print("未检测到任何目标。")
return

# 可视化结果
visualize(image, boxes, confidences, class_ids, output_path=output_image_file)

if __name__ == "__main__":
model_path = 'classroom_obd.onnx' # 请替换为您的ONNX模型路径(OpenVINO IR模型请先转换)
image_path = '002899.jpg'
output_image_file = "result.jpg"
predict(model_path, image_path, output_image_file)

YOLO OpenVINO的检测结果

性能优化建议

  1. 使用FP16或INT8精度:通过模型量化降低模型精度,如FP16或INT8,可提升推理速度。
  2. 指定设备:尝试将device设为GPU或其他加速设备,获得更高性能。
  3. 批量推理:对多张图像同时推理,提高吞吐量。

结论

本文介绍了如何使用OpenVINO Runtime对目标检测模型进行高效推理。 从模型加载、数据预处理,到推理后的非极大值抑制和结果可视化,您已了解完整的实现步骤。 OpenVINO在CPU、GPU等多种硬件设备上的高效支持,能够有效提升推理性能,为实际应用中部署深度学习目标检测模型提供了可靠的解决方案。

通过上述代码示例和优化建议,您可以轻松地将自己的目标检测模型集成到OpenVINO中,并根据实际需求进行性能调优和优化,加速您的计算机视觉应用落地。

鱼雪

在计算机视觉领域,目标检测是一个关键任务,广泛应用于安防监控、自动驾驶、智能零售等多个场景。 随着深度学习的发展,许多高效的目标检测模型如YOLOv8被广泛使用。 为了在生产环境中高效部署这些模型,ONNXRuntime作为一种跨平台的高性能推理引擎,成为了理想的选择。 本文将详细介绍如何使用ONNXRuntime进行目标检测,并通过代码示例展示整个流程。

目录

  1. 什么是ONNXRuntime?
  2. 为什么选择ONNXRuntime进行目标检测?
  3. 环境准备
  4. 代码详解
  5. 完整代码示例
  6. 性能优化与调优
  7. 结论

什么是ONNXRuntime?

ONNXRuntime 是由微软开发的一个高性能推理引擎,支持多种硬件加速器和操作系统。 它兼容ONNX(Open Neural Network Exchange)格式,这是一种开放的深度学习模型交换格式, 使模型在不同框架之间的迁移变得更加容易。

为什么选择ONNXRuntime进行目标检测?

  1. 高性能:ONNXRuntime经过高度优化,能够充分利用CPU和GPU的性能,加快推理速度。
  2. 跨平台:支持Windows、Linux、macOS等多种操作系统,且兼容多种编程语言如Python、C++等。
  3. 易于集成:ONNX格式的模型可以轻松集成到各种应用中,无需担心框架依赖。
  4. 支持多种硬件加速器:如NVIDIA的TensorRT、Intel的OpenVINO等,进一步提升推理效率。

环境准备

在开始之前,确保您的系统已安装以下软件:

  • Python 3.7+
  • ONNXRuntime
  • OpenCV
  • NumPy

您可以使用以下命令安装所需的Python库:

pip install onnxruntime opencv-python numpy

代码详解

下面我们将逐步解析实现目标检测的完整代码。

导入必要的库

首先,导入所有需要的Python库:

import cv2
import numpy as np
import onnxruntime as ort
import hashlib
  • cv2:用于图像处理。
  • numpy:用于数值计算。
  • onnxruntime:用于加载和运行ONNX模型。
  • hashlib:用于生成颜色映射。

定义类别与颜色映射

定义检测模型的类别,并为每个类别生成唯一的颜色,便于在图像上可视化。

# 定义您的12个类别
CLASSES = [
'book', 'bottle', 'cellphone', 'drink', 'eat', 'face',
'food', 'head', 'keyboard', 'mask', 'person', 'talk'
]

def name_to_color(name):
"""根据类名生成固定的颜色。"""
hash_str = hashlib.md5(name.encode('utf-8')).hexdigest()
r = int(hash_str[0:2], 16)
g = int(hash_str[2:4], 16)
b = int(hash_str[4:6], 16)
return (r, g, b) # OpenCV使用BGR格式
  • CLASSES:包含12个目标类别。
  • name_to_color:通过哈希算法为每个类别生成唯一颜色,确保不同类别在图像中具有不同颜色的边框。

辅助函数

定义一些辅助函数,包括激活函数、坐标转换和IoU计算。

def sigmoid(x):
"""Sigmoid激活函数。"""
return 1 / (1 + np.exp(-x))

def xywh2xyxy(x):
"""
将 (x, y, w, h) 转换为 (x1, y1, x2, y2)
"""
y = np.copy(x)
y[..., 0] = x[..., 0] - x[..., 2] / 2 # x1
y[..., 1] = x[..., 1] - x[..., 3] / 2 # y1
y[..., 2] = x[..., 0] + x[..., 2] / 2 # x2
y[..., 3] = x[..., 1] + x[..., 3] / 2 # y2
return y

def compute_iou(box, boxes):
"""
计算单个box与多个boxes的IoU
box: (4,) -> (x1, y1, x2, y2)
boxes: (N, 4)
"""
xmin = np.maximum(box[0], boxes[:, 0])
ymin = np.maximum(box[1], boxes[:, 1])
xmax = np.minimum(box[2], boxes[:, 2])
ymax = np.minimum(box[3], boxes[:, 3])

inter_w = np.maximum(0, xmax - xmin)
inter_h = np.maximum(0, ymax - ymin)
intersection = inter_w * inter_h

box_area = (box[2] - box[0]) * (box[3] - box[1])
boxes_area = (boxes[:,2] - boxes[:,0]) * (boxes[:,3] - boxes[:,1])

union = box_area + boxes_area - intersection
iou = intersection / union
return iou
  • sigmoid:用于将模型输出的类别分数映射到0到1之间。
  • xywh2xyxy:将中心坐标和宽高格式的框转换为左上角和右下角坐标格式。
  • compute_iou:计算两个框的交并比(IoU),用于非极大值抑制(NMS)。

加载ONNX模型

加载ONNX格式的目标检测模型,并获取模型的输入输出信息。

def load_model(model_path, providers=['CPUExecutionProvider']):
"""
加载ONNX模型
"""
session = ort.InferenceSession(model_path, providers=providers)
input_names = [inp.name for inp in session.get_inputs()]
output_names = [out.name for out in session.get_outputs()]
input_shape = session.get_inputs()[0].shape # 通常为 [batch, channel, height, width]
return session, input_names, output_names, input_shape
  • load_model:加载指定路径的ONNX模型,返回会话对象、输入输出名称及输入形状。

图像预处理

将输入图像读取并预处理为模型所需的格式。

def preprocess_image(image_path, input_width, input_height):
"""
读取并预处理图像
"""
image = cv2.imread(image_path)
if image is None:
raise FileNotFoundError(f"图像未找到: {image_path}")
original_height, original_width = image.shape[:2]
image_rgb = cv2.cvtColor(image, cv2.COLOR_BGR2RGB)
resized = cv2.resize(image_rgb, (input_width, input_height))
input_image = resized.astype(np.float32) / 255.0 # 归一化
input_image = input_image.transpose(2, 0, 1) # [H, W, C] -> [C, H, W]
input_tensor = np.expand_dims(input_image, axis=0) # [1, C, H, W]
return image, input_tensor, original_width, original_height
  • preprocess_image:读取图像,调整尺寸,归一化,并转换为模型输入所需的张量格式。

推理过程

使用ONNXRuntime进行模型推理,获取输出结果。

def predict(model_path, image_path, output_image_file, conf_threshold=0.6, iou_threshold=0.5):

# 加载模型
session, input_names, output_names, input_shape = load_model(model_path, providers=['CPUExecutionProvider'])
_, _, input_height, input_width = input_shape

# 预处理图像
image, input_tensor, original_width, original_height = preprocess_image(image_path, input_width, input_height)

# 推理
outputs = session.run(output_names, {input_names[0]: input_tensor})

# 后处理
boxes, confidences, class_ids = postprocess(
outputs,
original_width=original_width,
original_height=original_height,
input_width=input_width,
input_height=input_height,
conf_threshold=conf_threshold, # 置信度阈值
iou_threshold=iou_threshold # IoU 阈值
)

if len(boxes) == 0:
print("未检测到任何目标。")
return

# 可视化结果
visualize(image, boxes, confidences, class_ids, output_path=output_image_file)
  • predict:主函数,加载模型,预处理图像,执行推理,后处理结果,并可视化检测结果。

后处理与非极大值抑制(NMS)

对模型输出进行后处理,包括应用阈值和NMS以去除冗余框。

def postprocess(outputs, original_width, original_height, input_width, input_height, conf_threshold=0.7, iou_threshold=0.5):
"""
后处理步骤,按类别应用NMS
"""
# 假设只有一个输出,形状为 [1, 16, 8400]
output = outputs[0] # shape: (1,16,8400)
predictions = np.squeeze(output, axis=0).T # shape: (8400,16)

print(f"总预测数量: {predictions.shape[0]}")

# 前4列为 (x, y, w, h)
boxes = predictions[:, :4]

# 后12列为类别分数(需应用sigmoid)
class_scores = sigmoid(predictions[:, 4:])

# 找到每个预测的最大类别概率及其对应的类别ID
class_ids = np.argmax(class_scores, axis=1)
confidences = np.max(class_scores, axis=1)

# 应用置信度阈值
mask = confidences > conf_threshold
boxes = boxes[mask]
confidences = confidences[mask]
class_ids = class_ids[mask]

print(f"应用置信度阈值后: {boxes.shape[0]} 个框")
print(f"置信度分布: 最小={confidences.min():.4f}, 最大={confidences.max():.4f}, 平均={confidences.mean():.4f}")

if len(boxes) == 0:
return [], [], []

# 将 (x, y, w, h) 转换为 (x1, y1, x2, y2)
boxes_xyxy = xywh2xyxy(boxes)

# 映射回原始图像尺寸
scale_w = original_width / input_width
scale_h = original_height / input_height
boxes_xyxy[:, [0, 2]] *= scale_w
boxes_xyxy[:, [1, 3]] *= scale_h
boxes_xyxy = boxes_xyxy.astype(np.int32)

# 准备 NMS 所需的输入
boxes_list = boxes_xyxy.tolist()
scores_list = confidences.tolist()

# 使用 OpenCV 的 NMS 函数,按类别分开处理
final_boxes = []
final_confidences = []
final_class_ids = []

unique_classes = np.unique(class_ids)
for cls in unique_classes:
cls_mask = class_ids == cls
cls_boxes = [boxes_list[i] for i in range(len(class_ids)) if cls_mask[i]]
cls_scores = [scores_list[i] for i in range(len(class_ids)) if cls_mask[i]]

if len(cls_boxes) == 0:
continue

# OpenCV 的 NMSBoxes 需要以 [x, y, w, h] 的格式
# 这里我们需要将 (x1, y1, x2, y2) 转换为 (x, y, w, h)
cls_boxes_xywh = []
for box in cls_boxes:
x1, y1, x2, y2 = box
cls_boxes_xywh.append([x1, y1, x2 - x1, y2 - y1])

# 执行NMS
indices = cv2.dnn.NMSBoxes(cls_boxes_xywh, cls_scores, conf_threshold, iou_threshold)

if len(indices) > 0:
for i in indices.flatten():
final_boxes.append(cls_boxes[i])
final_confidences.append(cls_scores[i])
final_class_ids.append(cls)

print(f"应用NMS后: {len(final_boxes)} 个框")

return final_boxes, final_confidences, final_class_ids
  • 步骤解析
    1. 模型输出解析:假设模型输出形状为 [1, 16, 8400],即1个批次、16(4个坐标值+12个类别)、8400个预测框。
    2. Sigmoid激活:将类别分数通过Sigmoid函数映射到0到1之间。
    3. 置信度筛选:只保留置信度高于阈值的预测框。
    4. 坐标转换:将中心坐标和宽高转换为左上角和右下角坐标,并映射回原始图像尺寸。
    5. 非极大值抑制(NMS):按类别对预测框进行NMS,去除冗余框。

可视化检测结果

在原始图像上绘制检测到的目标框及其类别标签。

def visualize(image, boxes, confidences, class_ids, output_path='result.jpg'):
"""
在图像上绘制检测结果
"""
image_draw = image.copy()
for (bbox, score, cls_id) in zip(boxes, confidences, class_ids):
x1, y1, x2, y2 = bbox
cls_name = CLASSES[cls_id]
label = f"{cls_name}:{score:.2f}"
color = name_to_color(cls_name) # 绿色框
cv2.rectangle(image_draw, (x1, y1), (x2, y2), color, 2)
# 绘制标签背景
(label_width, label_height), _ = cv2.getTextSize(label, cv2.FONT_HERSHEY_SIMPLEX, 0.5, 1)
cv2.rectangle(image_draw, (x1, y1 - label_height - 10), (x1 + label_width, y1), color, -1)
# 绘制标签文字
cv2.putText(image_draw, label, (x1, y1 - 5),
cv2.FONT_HERSHEY_SIMPLEX, 0.5, (0,0,0), 1, cv2.LINE_AA)
cv2.imwrite(output_path, image_draw)
print(f"推理完成,结果已保存为 {output_path}")
  • 功能
    • 遍历所有检测到的目标,绘制矩形框。
    • 在框的上方显示类别名称和置信度。
    • 使用预先生成的颜色区分不同类别。

整体预测流程

将以上步骤整合在一起,实现完整的目标检测流程。

def predict(model_path, image_path, output_image_file, conf_threshold=0.6, iou_threshold=0.5):

# 加载模型
session, input_names, output_names, input_shape = load_model(model_path, providers=['CPUExecutionProvider'])
_, _, input_height, input_width = input_shape

# 预处理图像
image, input_tensor, original_width, original_height = preprocess_image(image_path, input_width, input_height)

# 推理
outputs = session.run(output_names, {input_names[0]: input_tensor})

# 后处理
boxes, confidences, class_ids = postprocess(
outputs,
original_width=original_width,
original_height=original_height,
input_width=input_width,
input_height=input_height,
conf_threshold=conf_threshold, # 置信度阈值
iou_threshold=iou_threshold # IoU 阈值
)

if len(boxes) == 0:
print("未检测到任何目标。")
return

# 可视化结果
visualize(image, boxes, confidences, class_ids, output_path=output_image_file)
  • 流程步骤
    1. 加载模型。
    2. 预处理输入图像。
    3. 进行推理,获取模型输出。
    4. 对输出进行后处理,筛选有效框。
    5. 在图像上绘制检测结果并保存。

完整代码示例

以下是完整的目标检测代码,结合了上述所有部分:

import cv2
import numpy as np
import onnxruntime as ort
import yaml
import hashlib

def name_to_color(name):
"""根据类名生成固定的颜色。"""
hash_str = hashlib.md5(name.encode('utf-8')).hexdigest()
r = int(hash_str[0:2], 16)
g = int(hash_str[2:4], 16)
b = int(hash_str[4:6], 16)
return (r, g, b) # OpenCV使用BGR格式

# 定义您的12个类别
CLASSES = [
'book', 'bottle', 'cellphone', 'drink', 'eat', 'face',
'food', 'head', 'keyboard', 'mask', 'person', 'talk'
]

def sigmoid(x):
"""Sigmoid激活函数。"""
return 1 / (1 + np.exp(-x))

def xywh2xyxy(x):
"""
将 (x, y, w, h) 转换为 (x1, y1, x2, y2)
"""
y = np.copy(x)
y[..., 0] = x[..., 0] - x[..., 2] / 2 # x1
y[..., 1] = x[..., 1] - x[..., 3] / 2 # y1
y[..., 2] = x[..., 0] + x[..., 2] / 2 # x2
y[..., 3] = x[..., 1] + x[..., 3] / 2 # y2
return y

def compute_iou(box, boxes):
"""
计算单个box与多个boxes的IoU
box: (4,) -> (x1, y1, x2, y2)
boxes: (N, 4)
"""
xmin = np.maximum(box[0], boxes[:, 0])
ymin = np.maximum(box[1], boxes[:, 1])
xmax = np.minimum(box[2], boxes[:, 2])
ymax = np.minimum(box[3], boxes[:, 3])

inter_w = np.maximum(0, xmax - xmin)
inter_h = np.maximum(0, ymax - ymin)
intersection = inter_w * inter_h

box_area = (box[2] - box[0]) * (box[3] - box[1])
boxes_area = (boxes[:,2] - boxes[:,0]) * (boxes[:,3] - boxes[:,1])

union = box_area + boxes_area - intersection
iou = intersection / union
return iou

def load_model(model_path, providers=['CPUExecutionProvider']):
"""
加载ONNX模型
"""
session = ort.InferenceSession(model_path, providers=providers)
input_names = [inp.name for inp in session.get_inputs()]
output_names = [out.name for out in session.get_outputs()]
input_shape = session.get_inputs()[0].shape # 通常为 [batch, channel, height, width]
return session, input_names, output_names, input_shape

def preprocess_image(image_path, input_width, input_height):
"""
读取并预处理图像
"""
image = cv2.imread(image_path)
if image is None:
raise FileNotFoundError(f"图像未找到: {image_path}")
original_height, original_width = image.shape[:2]
image_rgb = cv2.cvtColor(image, cv2.COLOR_BGR2RGB)
resized = cv2.resize(image_rgb, (input_width, input_height))
input_image = resized.astype(np.float32) / 255.0 # 归一化
input_image = input_image.transpose(2, 0, 1) # [H, W, C] -> [C, H, W]
input_tensor = np.expand_dims(input_image, axis=0) # [1, C, H, W]
return image, input_tensor, original_width, original_height

def postprocess(outputs, original_width, original_height, input_width, input_height, conf_threshold=0.7, iou_threshold=0.5):
"""
后处理步骤,按类别应用NMS
"""
# 假设只有一个输出,形状为 [1, 16, 8400]
output = outputs[0] # shape: (1,16,8400)
predictions = np.squeeze(output, axis=0).T # shape: (8400,16)

print(f"总预测数量: {predictions.shape[0]}")

# 前4列为 (x, y, w, h)
boxes = predictions[:, :4]

# 后12列为类别分数(需应用sigmoid)
class_scores = sigmoid(predictions[:, 4:])

# 找到每个预测的最大类别概率及其对应的类别ID
class_ids = np.argmax(class_scores, axis=1)
confidences = np.max(class_scores, axis=1)

# 应用置信度阈值
mask = confidences > conf_threshold
boxes = boxes[mask]
confidences = confidences[mask]
class_ids = class_ids[mask]

print(f"应用置信度阈值后: {boxes.shape[0]} 个框")
print(f"置信度分布: 最小={confidences.min():.4f}, 最大={confidences.max():.4f}, 平均={confidences.mean():.4f}")

if len(boxes) == 0:
return [], [], []

# 将 (x, y, w, h) 转换为 (x1, y1, x2, y2)
boxes_xyxy = xywh2xyxy(boxes)

# 映射回原始图像尺寸
scale_w = original_width / input_width
scale_h = original_height / input_height
boxes_xyxy[:, [0, 2]] *= scale_w
boxes_xyxy[:, [1, 3]] *= scale_h
boxes_xyxy = boxes_xyxy.astype(np.int32)

# 准备 NMS 所需的输入
boxes_list = boxes_xyxy.tolist()
scores_list = confidences.tolist()

# 使用 OpenCV 的 NMS 函数,按类别分开处理
final_boxes = []
final_confidences = []
final_class_ids = []

unique_classes = np.unique(class_ids)
for cls in unique_classes:
cls_mask = class_ids == cls
cls_boxes = [boxes_list[i] for i in range(len(class_ids)) if cls_mask[i]]
cls_scores = [scores_list[i] for i in range(len(class_ids)) if cls_mask[i]]

if len(cls_boxes) == 0:
continue

# OpenCV 的 NMSBoxes 需要以 [x, y, w, h] 的格式
# 这里我们需要将 (x1, y1, x2, y2) 转换为 (x, y, w, h)
cls_boxes_xywh = []
for box in cls_boxes:
x1, y1, x2, y2 = box
cls_boxes_xywh.append([x1, y1, x2 - x1, y2 - y1])

# 执行NMS
indices = cv2.dnn.NMSBoxes(cls_boxes_xywh, cls_scores, conf_threshold, iou_threshold)

if len(indices) > 0:
for i in indices.flatten():
final_boxes.append(cls_boxes[i])
final_confidences.append(cls_scores[i])
final_class_ids.append(cls)

print(f"应用NMS后: {len(final_boxes)} 个框")

return final_boxes, final_confidences, final_class_ids

def visualize(image, boxes, confidences, class_ids, output_path='result.jpg'):
"""
在图像上绘制检测结果
"""
image_draw = image.copy()
for (bbox, score, cls_id) in zip(boxes, confidences, class_ids):
x1, y1, x2, y2 = bbox
cls_name = CLASSES[cls_id]
label = f"{cls_name}:{score:.2f}"
color = name_to_color(cls_name) # 类别颜色
cv2.rectangle(image_draw, (x1, y1), (x2, y2), color, 2)
# 绘制标签背景
(label_width, label_height), _ = cv2.getTextSize(label, cv2.FONT_HERSHEY_SIMPLEX, 0.5, 1)
cv2.rectangle(image_draw, (x1, y1 - label_height - 10), (x1 + label_width, y1), color, -1)
# 绘制标签文字
cv2.putText(image_draw, label, (x1, y1 - 5),
cv2.FONT_HERSHEY_SIMPLEX, 0.5, (0,0,0), 1, cv2.LINE_AA)
cv2.imwrite(output_path, image_draw)
print(f"推理完成,结果已保存为 {output_path}")

def predict(model_path, image_path, output_image_file, conf_threshold=0.6, iou_threshold=0.5):

# 加载模型
session, input_names, output_names, input_shape = load_model(model_path, providers=['CPUExecutionProvider'])
_, _, input_height, input_width = input_shape

# 预处理图像
image, input_tensor, original_width, original_height = preprocess_image(image_path, input_width, input_height)

# 推理
outputs = session.run(output_names, {input_names[0]: input_tensor})

# 后处理
boxes, confidences, class_ids = postprocess(
outputs,
original_width=original_width,
original_height=original_height,
input_width=input_width,
input_height=input_height,
conf_threshold=conf_threshold, # 置信度阈值
iou_threshold=iou_threshold # IoU 阈值
)

if len(boxes) == 0:
print("未检测到任何目标。")
return

# 可视化结果
visualize(image, boxes, confidences, class_ids, output_path=output_image_file)

if __name__ == "__main__":
model_path = 'classroom_obd.onnx'
image_path = '002899.jpg'
output_image_file = "onnxruntime_result.jpg"
predict(model_path, image_path, output_image_file)
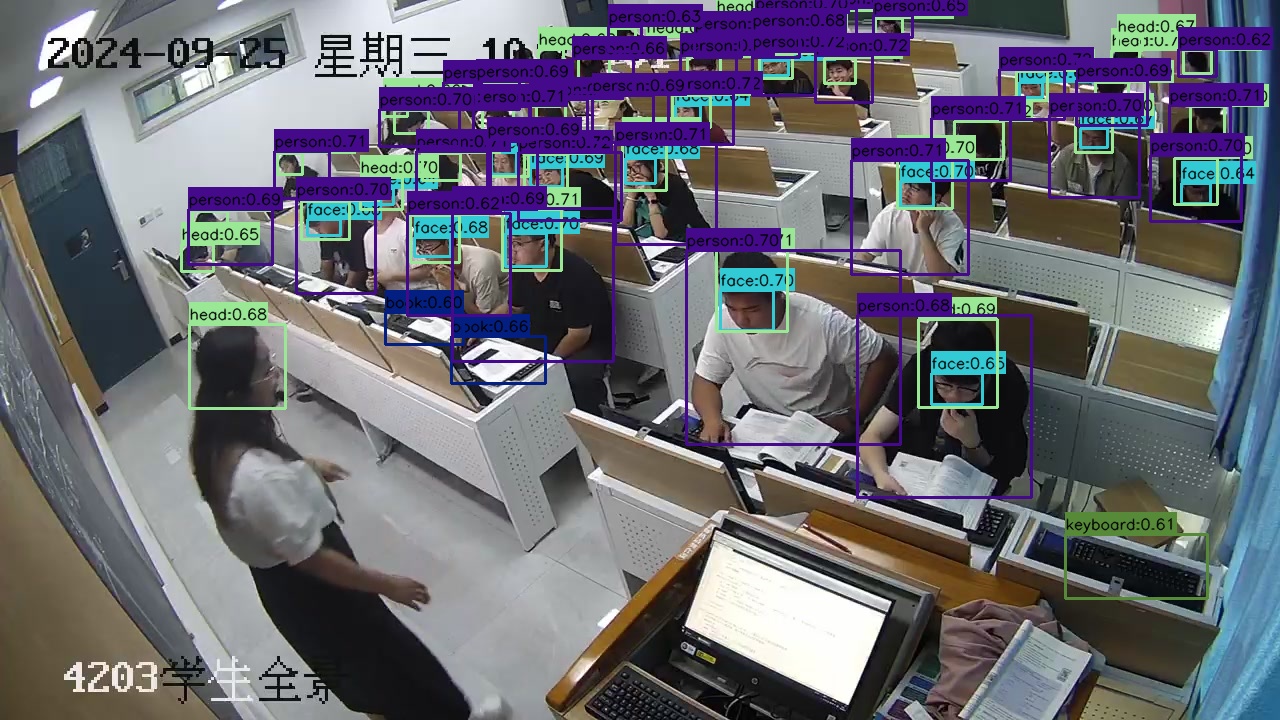
代码运行示例

运行上述代码后,您将获得一张带有检测框和类别标签的图像。例如:

总预测数量: 8400
应用置信度阈值后: 599 个框
置信度分布: 最小=0.7012, 最大=0.9987, 平均=0.8564
应用NMS后: 98 个框
推理完成,结果已保存为 result.jpg

检测结果

性能优化与调优

为了提升目标检测的推理性能,您可以考虑以下优化方法:

  1. 硬件加速:ONNXRuntime支持多种硬件加速器,如CPU、GPU。通过配置providers参数,可以利用GPU加速推理。

    session, input_names, output_names, input_shape = load_model(model_path, providers=['CUDAExecutionProvider'])
  2. 模型量化:通过量化模型(如INT8量化),可以减少模型大小和加快推理速度,同时保持较高的准确性。

  3. 批处理推理:如果处理多张图像,可以批量输入,提高推理效率。

  4. 优化图像预处理:使用更高效的图像处理库或方法,加快预处理速度。

  5. 模型剪枝:通过剪枝技术减少模型参数,提升推理速度。

结论

本文详细介绍了如何使用ONNXRuntime进行目标检测,从模型加载、图像预处理、推理到后处理和结果可视化。 ONNXRuntime凭借其高性能和灵活性,是部署深度学习模型的理想选择。 通过本文提供的代码示例,您可以轻松实现高效的目标检测系统,并根据具体需求进行性能优化。

鱼雪

概述

Burn 0.15.0 带来了显著的性能改进,特别是在矩阵乘法和卷积操作方面。

此外,此版本还引入了以下重要更新:

  • 实验性支持:新增 ROCm/HIPSPIR-V 支持,通过 CubeCL 运行时实现。
  • 多后端兼容性:奠定多后端支持的基础。
  • 新特性:增加了量化操作支持。
  • ONNX 支持扩展:包括更多的算子支持和错误修复,以提升覆盖率。

除此之外,Burn 0.15.0 还包含多项错误修复、性能优化、新的张量操作,以及改进的文档支持。


模块与张量相关更新

  • 移除:对常量泛型模块的拷贝限制。
  • 新增deform_conv2d(实现于 torchvision)、Softminroundfloorceil 等浮点操作。
  • 增强:为张量同步增加支持,添加 tensor.one_hot 整数操作。
  • 更改:LR 调度器调整为首次调用 .step() 时返回初始学习率。

ONNX 支持扩展

  • 支持多维索引的 gather 操作。
  • 增强张量形状跟踪能力。
  • 新增 ConvTranspose1dtrilu 操作支持。
  • 修复 where 操作在标量输入下的行为。

后端改进

  • 支持 CudaDeviceMetalDevice,避免重复创建设备。
  • 新增 SPIR-V 编译器支持 (burn-wgpu) 和 HIP 支持 (burn-hip)。
  • 引入 BackendRouter,为分布式后端处理铺路。
  • 修复自动微分相关的内存泄漏和 NaN 问题。

文档与示例

  • 新增自定义 cubecl 内核的文档。
  • 改进了回归任务的示例和 burn-tch 文档。
  • 修复了多个 Burn Book 的链接及 Raspberry Pi 示例的编译问题。

性能与优化

  • 性能提升:增强了切片内核的性能,改进了 conv2dconv_transpose2d 的自动调优。
  • 数据局部性优化:为隐式 GEMM 提供更好的性能支持,并新增边界检查以支持任意输入形状。

Miscellaneous 更新

  • 工具链:更新了 CI 工作流及工具,修复编译器设置的多处问题。
  • 兼容性:确保最小支持 Rust 版本为 1.81。

参考


通过 Burn 0.15.0,深度学习开发者可以更高效地利用 GPU 加速和量化技术,同时享受多后端支持带来的灵活性。欢迎尝试新版本并加入我们的社区,共同推动 Rust 生态的技术进步!

鱼雪

背景

在深度学习和高性能计算中,矩阵乘法(Matmul)是核心操作之一, 也是现代 AI 模型如 GPT 和 Transformer 的基础计算单元。

随着 WebGPU 的发展,我们可以在浏览器中高效运行 GPU 计算,为前端机器学习应用带来了更多可能。

本文将通过五个阶段,从基础内核出发,逐步优化 WebGPU 矩阵乘法内核, 最终达到 超过 1TFLOPS 的性能,并探讨 WebGPU 与 CUDA 的区别及应用场景。


什么是 WebGPU?

WebGPU 是为浏览器设计的下一代 GPU 编程接口,原生支持计算着色器(Compute Shader), 通过使用 WGSL(WebGPU Shading Language) 编写 GPU 代码, 并支持多种硬件平台(如 Vulkan 和 Metal)。

优势

  1. 跨平台:兼容 Vulkan、Metal 和 DirectX。
  2. 高性能:原生支持并行计算,如矩阵乘法和深度学习。
  3. 便捷性:无需传统 WebGL 的复杂 hack,可直接进行机器学习计算。

WebGPU 与 CUDA 的区别

特性WebGPUCUDA
硬件支持跨平台(支持 Vulkan、Metal)NVIDIA 专用
并行模型线程、工作组(Workgroup)、网格(Grid)线程块(ThreadBlock)、网格
开发语言WGSLCUDA C
适用场景前端高性能计算、跨平台机器学习专业高性能计算、训练 AI 模型

WebGPU 计算着色器基础

  1. 线程(Thread):最小的并行执行单元。
  2. 工作组(Workgroup):线程的集合,支持组内存共享。
  3. 网格(Grid):多个工作组组成的并行执行结构。

示例:@workgroup_size(x, y, z) 定义每个工作组的线程数量为 (x \times y \times z)。

矩阵乘法优化的五个阶段

阶段 1:基础实现

Python 示例:

def matmul(a, b, c):
m, k, n = len(a), len(a[0]), len(b[0])
for i in range(m):
for j in range(n):
c[i][j] = sum(a[i][l] * b[l][j] for l in range(k))

WGSL 实现:

@compute @workgroup_size(1)
fn main(@builtin(global_invocation_id) global_id: vec3<u32>) {
let row = global_id.x / dimensions.N;
let col = global_id.x % dimensions.N;
if (row < dimensions.M && col < dimensions.N) {
var sum = 0.0;
for (var i: u32 = 0; i < dimensions.K; i++) {
sum += a[row * dimensions.K + i] * b[i * dimensions.N + col];
}
result[row * dimensions.N + col] = sum;
}
}

存在问题:

  • 每个线程仅计算一个结果,导致大量工作组启动开销高。
  • 每个工作组重复加载数据,没有利用缓存。

阶段 2:增加线程数量

通过提高每个工作组的线程数(如 @workgroup_size(256)),显著减少工作组的数量,从而降低启动开销。

阶段 3:二维工作组优化

通过将工作组从一维扩展到二维(如 (16 \times 16)),使每个工作组能够并行计算更多结果。

@compute @workgroup_size(16, 16)
fn main(@builtin(global_invocation_id) global_id: vec3<u32>) {
let row = global_id.y;
let col = global_id.x;
...
}

阶段 4:内核平铺(Tiling)

采用平铺策略,每个线程一次计算多个结果(如 (1 \times 4)),进一步提升性能。

阶段 5:循环展开(Unrolling)

通过手动展开循环,减少 GPU 在运行时的循环控制开销,并利用指令级并行,性能大幅提升。

优化成果

  • 性能提升 超过 1000 倍,达到 1TFLOPS 的运算强度。
  • 有效利用 WebGPU 的多线程并行与缓存机制。
  • 实现了更高效的矩阵乘法内核,适用于前端高性能计算场景。

参考资料

鱼雪

YOLO(You Only Look Once)是一种广泛使用的目标检测模型,近年来也逐渐应用于图像分割和姿态估计任务。本篇文章将详细讲解YOLO模型在目标检测、图像分割及姿态估计中的应用,通过代码和预测结果分析帮助您更好地理解和使用YOLO模型。

Ultralytics库的所有预测结果都放在Result对象中,适用于目标检测、图像分割和姿态估计等任务,本文也将详细介绍如何处理不同任务的预测结果。

任务概述与对比

YOLO支持三种主要视觉任务,每个任务都有其独特的输出结构和应用场景:

  1. 目标检测(Object Detection)

    • 输出:边界框(boxes)和类别标签
    • 特点:定位物体位置并进行分类
    • 应用场景:物体识别、车辆检测、人脸检测等
  2. 图像分割(Image Segmentation)

    • 输出:像素级别掩码(masks)和类别标签
    • 特点:提供物体精确的轮廓信息
    • 应用场景:医学图像分析、场景理解等
  3. 姿态估计(Pose Estimation)

    • 输出:人体关键点坐标(keypoints)和骨架连接
    • 特点:识别人体姿态和动作
    • 应用场景:运动分析、姿态追踪、行为监控等

YOLO模型的预测结果对象结构

所有任务的预测结果都封装在Results对象中,Results对象包含以下通用属性:

- orig_img: 原始图像数据
- orig_shape: 原始图像尺寸(,)
- path: 输入图像路径
- save_dir: 结果保存路径
- speed: 预测耗时信息

这些属性帮助我们在不同任务中标准化处理预测结果。

目标检测

目标检测的代码实现

下面的代码演示了如何使用YOLO进行目标检测,识别图像中的物体,并将检测结果(包括边界框和类别标签)绘制在原始图像上。

import os
from ultralytics import YOLO
import cv2
import os
import glob
import shutil

OBJECT_DETECTION_MODEL_PATH = './models/object_detection.onnx'
TASK_NAME = 'detect'

def generate_colors(names):
colors = {}
for name in names:
hash_object = hashlib.md5(name.encode())
hash_int = int(hash_object.hexdigest(), 16)
b = (hash_int & 0xFF0000) >> 16
g = (hash_int & 0x00FF00) >> 8
r = hash_int & 0x0000FF
colors[name] = (b, g, r) # OpenCV 使用 BGR 顺序
return colors

# 单张图像目标检测预测
def predict_single_image_by_detect(image_path, out_image_file):
# 获取输出文件`out_image_path`文件所在的目录
out_dir = os.path.dirname(out_image_path)
os.makedirs(out_dir, exist_ok=True)

image_list = [image_path]
results = model(image_list)

for result in results:
boxes = result.boxes
if boxes is None:
cv2.imwrite(out_image_file, result.orig_img)
continue
boxes_data = boxes.data.cpu().numpy()
names = result.names
class_names = list(names.values())

color_map = generate_colors(class_names)

img = result.orig_img

for box in boxes_data:
x1, y1, x2, y2, score, class_id = box
x1, y1, x2, y2 = map(int, [x1, y1, x2, y2])
class_name = names[int(class_id)]
color = color_map[class_name]
cv2.rectangle(img, (x1, y1), (x2, y2), color, 2)
label = f'{class_name} {score:.2f}'
cv2.putText(img, label, (x1, max(y1 - 10, 0)),
cv2.FONT_HERSHEY_SIMPLEX, 0.9, color, 2)
print(f"图像写入路径: {out_image_file}")
cv2.imwrite(out_image_file, img)

if __name__ == '__main__':
# 预测单张图像
image_path = 'bus.jpg'
out_image_path = image_path + '_predicted.jpg'
predict_single_image_by_detect(image_path, out_image_path)

目标检测结果分析

在目标检测任务中,Results对象中最重要的字段是:

  • boxes:包含边界框的坐标、置信度和类别ID。
  • names:类别标签映射。
  • orig_img:原始图像数据。

每个边界框包含以下六个值:

[x1, y1, x2, y2, score, class_id]
# x1, y1: 左上角坐标
# x2, y2: 右下角坐标
# score: 检测置信度
# class_id: 类别ID

图像分割

图像分割的代码实现

图像分割任务比目标检测更加精细,它不仅需要识别物体的类别,还要提取每个物体的准确轮廓。

import os
import hashlib
import cv2
import numpy as np
from ultralytics import YOLO
import glob
import shutil

SEGMENT_MODEL_PATH = "./models/segmentation.onnx"
TASK_NAME = 'segment'
model = YOLO(SEGMENT_MODEL_PATH, task=TASK_NAME)

# 单张图像的分割模型预测函数
def predict_single_image_by_segment(image_path, out_image_path):
out_dir = os.path.dirname(out_image_path)
os.makedirs(out_dir, exist_ok=True)

results = model.predict(source=image_path)

for result in results:
if result.masks is None:
cv2.imwrite(out_image_path, result.orig_img)
continue
masks = result.masks.data.cpu().numpy()
boxes = result.boxes.data.cpu().numpy()
label_map = result.names
color_map = generate_colors(label_map.values())

img_with_masks = result.orig_img.copy()

for i, mask in enumerate(masks):
mask = mask.astype(np.uint8)
mask = cv2.resize(mask, (result.orig_shape[1], result.orig_shape[0]))

color = np.random.randint(0, 255, (3,), dtype=np.uint8)
colored_mask = np.zeros_like(result.orig_img, dtype=np.uint8)
colored_mask[mask > 0] = color

img_with_masks = cv2.addWeighted(img_with_masks, 1, colored_mask, 0.5, 0)

box_data = boxes[i]
x1, y1, x2, y2 = map(int, box_data[:4])
class_name = label_map[int(box_data[5])]
score = box_data[4]
cv2.rectangle(img_with_masks, (x1, y1), (x2, y2), color_map[class_name], 2)
label = f"{class_name}: {score:.4f}"
cv2.putText(img_with_masks, label, (x1, y1 - 10), cv2.FONT_HERSHEY_SIMPLEX, 0.6, (0, 255, 0), 2)

cv2.imwrite(out_image_path, img_with_masks)
print(f"Prediction saved to {out_image_path}")

if __name__ == '__main__':
image_path = 'bus.jpg'
out_image_path = image_path + '_segmented.jpg'
predict_single_image_by_segment(image_path, out_image_path)

图像分割结果分析

Results对象的特有字段:

  • masks:实例分割掩码数据。
  • boxes:边界框信息。
  • names:类别标签映射。

掩码数据为二值化图像,需调整到与原图相同的尺寸,并与原图叠加进行可视化。

姿态估计

姿态估计的代码实现

姿态估计的目标是检测人体的关键点,并根据关键点绘制出人体骨架。

import cv2
from ultralytics import YOLO
import os

POSE_MODEL_PATH = './models/pose.onnx'
TASK_NAME = 'pose'
model = YOLO(POSE_MODEL_PATH, task=TASK_NAME)

def predict_single_image_by_pose(image_path, out_image_path):
out_dir = os.path.dirname(out_image_path)
os.makedirs(out_dir, exist_ok=True)

results = model.predict(source=image_path)

for result in results:
if result.keypoints is None:
continue
if result.boxes is None:
continue

orig_img = result.orig_img
keypoints = result.keypoints.data.cpu().numpy()
boxes = result.boxes.data.cpu().numpy()

for box_data, kpts in zip(boxes, keypoints):
for keypoint in kpts:
x, y, score = keypoint
cv2.circle(orig_img, (int(x), int(y)), 3, (255, 0, 0), -1)

for connection in skeleton:
part_a, part_b = connection
if kpts[part_a][2] > 0.5 and kpts[part_b][2] > 0.5:
x1, y1 = int(kpts[part_a][0]), int(kpts[part_a][1])
x2, y2 = int(kpts[part_b][0]), int(kpts[part_b][1])
cv2.line(orig_img, (x1, y1), (x2, y2), (0, 255, 255), 1)

cv2.imwrite(out_image_path, orig_img)

if __name__ == '__main__':
image_path = 'bus.jpg'
out_image_path = image_path + '_posed.jpg'
predict_single_image_by_pose(image_path, out_image_path)

姿态估计结果分析

  • keypoints:包含人体关键点坐标和置信度。
  • boxes:人体检测框。
  • names:通常为'person'类别。

每个关键点包含以下数据结构:

[x, y, confidence]  # 每个关键点包含坐标和置信度

实践建议

  1. 数据预处理

    • 确保输入图像尺寸适合模型。
    • 检查图像格式(OpenCV通常使用BGR格式)。
    • 视需要进行图像增强。
  2. 结果处理注意事项

    • 始终进行空值检查。
    • 将tensor数据转换为numpy格式。
    • 坐标值转换为整数,确保OpenCV兼容性。
  3. 性能优化

    • 尽量批量处理图像以提高效率。
    • 使用GPU加速推理过程。
    • 根据实际需求选择合适的模型大小。
  4. 可视化建议

    • 为不同类别分配固定颜色,以便更好区分。
    • 调整线条的粗细和标签字体大小,保持预测结果可读性。

总结

YOLO在目标检测、图像分割和姿态估计三大任务中的表现令人印象深刻,模型的高度通用性使其成为计算机视觉领域中的热门选择。

  1. 数据结构差异

    • 目标检测:处理boxes数据。
    • 图像分割:同时处理masks和boxes。
    • 姿态估计:处理关键点(keypoints)和骨架结构。
  2. 应用场景

    • 目标检测:适用于物体定位和分类。
    • 图像分割:适用于精确轮廓分析。
    • 姿态估计:适用于人体动作追踪与行为分析。
  3. 通用处理流程

    • 模型加载与初始化。
    • 数据预处理。
    • 结果处理与可视化。
    • 错误与异常检查。
鱼雪

Burn 是一个新型的、全面的 动态深度学习框架,使用 Rust 构建,目标是提供极高的 灵活性计算效率可移植性。通过自动内核融合、异步执行和多硬件后端的支持,Burn 为开发者提供了前所未有的高性能深度学习体验。

Burn 的主要特性

  • 自动内核融合:通过动态生成 GPU 内核,提升模型执行效率。
  • 异步执行架构:保证框架与计算的独立性,提升系统性能。
  • 多后端集成:支持多种硬件架构,跨平台高效执行。
  • 线程安全与智能内存管理:利用 Rust 的所有权系统,确保训练过程中的安全与效率。

性能优化:自动内核融合与异步执行

自动内核融合 💥

Burn 提供自动内核融合,意味着在任何后端都能对模型进行优化。在可能的情况下,Burn 自动创建自定义低级内核,特别适用于需要最小化内存迁移的场景,从而显著提升模型的计算效率。

以下是一个 Rust 代码片段,展示如何实现自定义 GELU 激活函数:

fn gelu_custom<B: Backend, const D: usize>(x: Tensor<B, D>) -> Tensor<B, D> {
let x = x.clone() * ((x / SQRT_2).erf() + 1);
x / 2
}

在运行时,Burn 会为这个自定义实现自动创建内核,与手工编写的 GPU 实现性能相媲美。目前,自动内核融合仅支持 WGPU 后端,未来会扩展到其他后端。

异步执行 ❤️‍🔥

Burn 的后端采用 异步执行风格,这使得模型的计算不会阻塞框架的正常执行,确保系统的高响应性。这种异步架构还为自动内核融合等优化技术提供了支持,进一步提高执行效率。更多关于异步执行的信息,请访问 Burn 博客

线程安全的模块 🦞

Burn 利用 Rust 的所有权系统,使每个模块成为其权重的唯一所有者。这样可以安全地将模块发送到不同线程进行计算,适合多设备训练,避免了传统框架中的同步问题。

智能内存管理 🦀

内存管理 是深度学习框架的关键之一。Burn 使用内存池减少频繁的内存分配和释放,从而提升吞吐量,并通过跟踪张量的所有权在适当时候进行就地突变,进一步减少内存使用。有关内存管理的更多详细信息,请参考 Burn 博客

自动内核选择 🎯

Burn 会自动运行基准测试并为硬件选择最佳内核配置,以确保在所有硬件上高效执行。这稍微增加了热身时间,但会在几次前向和后向传递后稳定下来,大大提高长期执行效率。

硬件特定优化 🔥

Burn 支持多种硬件特性,例如 Nvidia Tensor Cores。目前,Tensor Cores 支持通过 LibTorch 和 Candle 后端进行优化,但还未支持其他加速器。我们计划在未来为 WGPU 后端引入类似的硬件支持。

扩展与灵活性:后端扩展与自定义实现

Burn 提供了丰富的扩展能力,使开发者能够轻松地为模型添加自定义操作或编写特定后端的内核。例如,可以手动编写快闪注意力的实现来提升性能。更多关于后端扩展的信息,请参考 Burn Book

Burn 的深度学习工作流程

培训与推理

Burn 从一开始就考虑了深度学习的培训和推理过程,提供了符合人体工程学的仪表板来监控训练进展,并能够在从嵌入式设备到大型 GPU 集群的任意设备上运行推理。

  • 培训仪表板 📈:Burn 提供基于 Ratatui 框架的终端 UI 仪表板,用户可以方便地实时跟踪训练和验证指标。
  • ONNX 支持 🐫:Burn 支持导入符合 ONNX 标准的模型,便于将其他框架(如 TensorFlow 或 PyTorch)的模型移植到 Burn。
  • 浏览器推理 🌐:通过编译为 Web Assembly,Burn 支持直接在浏览器内运行推理。您可以查看以下示例:

多后端支持

Burn 致力于成为一个 跨平台、支持多后端的深度学习框架,旨在满足不同硬件和开发需求的灵活性。

支持的后端

  1. WGPU 后端 🌐:基于 Rust 图形库 WGPU,支持跨平台 GPU 加速,适用于从 Vulkan 到 WebGPU 等多种环境。更多信息,请参考 WGPU 后端 README
  2. Candle 后端 🕯:基于 Hugging Face 的 Candle,支持 Web Assembly 和 CUDA,适合极简的高性能模型。更多信息,请参考 Candle 后端 README
  3. LibTorch 后端 🎆:基于 PyTorch 的 Rust 绑定,支持 CPU、CUDA 和 Metal,加速深度学习模型训练和推理。更多信息,请参考 LibTorch 后端 README
  4. NdArray 后端 🦐:轻量级 CPU 后端,唯一支持 no_std 的后端,可在无操作系统环境下运行。更多信息,请参考 NdArray 后端 README
  5. Autodiff 后端 🔄:作为后端修饰器,为任何基础后端增加自动微分支持,用于模型训练。更多信息,请参考 Autodiff 后端 README
  6. Fusion 后端 💥:为支持内核融合的后端增加内核融合特性,目前仅 WGPU 后端支持融合。更多信息,请参考 Fusion 后端 README

入门指南

The Burn Book 🔥

要有效地开始使用 Burn,建议阅读 The Burn Book 的前几章,了解 Burn 的关键组成部分和哲学,涵盖了张量、模块和优化器等构建模块的详细示例。

示例代码 🙏

以下是一个简单的代码片段,展示 Burn 的模块声明和前向传播实现:

use burn::nn;
use burn::module::Module;
use burn::tensor::backend::Backend;

#[derive(Module, Debug)]
pub struct PositionWiseFeedForward<B: Backend> {
linear_inner: nn::Linear<B>,
linear_outer: nn::Linear<B>,
dropout: nn::Dropout,
gelu: nn::Gelu,
}

impl<B: Backend> PositionWiseFeedForward<B> {
pub fn forward<const D: usize>(&self,

input: Tensor<B, D>) -> Tensor<B, D> {
let x = self.linear_inner.forward(input);
let x = self.gelu.forward(x);
let x = self.dropout.forward(x);

self.linear_outer.forward(x)
}
}

我们还提供了丰富的 代码示例,展示如何在不同情景中使用 Burn。

为什么选择 Rust 进行深度学习 🦀

Rust 提供了 零成本抽象 和强大的 内存管理,是深度学习开发的理想选择。Rust 提供高性能和安全性,同时使用 Cargo 作为包管理器,可以轻松地构建、测试和部署应用程序。

Rust 的学习曲线可能较为陡峭,但一旦掌握,它可以提供更可靠、无 bug 的解决方案,极大地提升开发效率和代码质量。

结论

Burn 是一个功能强大的 Rust 深度学习框架,支持自动内核融合、异步执行、多后端集成,适用于从嵌入式设备到大型 GPU 集群的各种场景。如果您对深度学习的性能和灵活性有高要求,并且希望探索 Rust 的强大能力,那么 Burn 会是一个绝佳的选择。

鱼雪